Showing posts with label Wedding. Show all posts

Jul 18, 2014

Quilled Champagne Congratulations, A New Tutorial Pattern!


My friends got engaged and I wanted to quill them something to commemorate the happy occasion. Champagne glasses immediately came to mind and then I wondered what to put around the clinking glasses — confetti and streamers of course!


I think of pink for a rosy congratulations, whether for a graduation or even an invite to "eat, drink, and be merry". The example shown here has the pink dots ready-to-print along with the frame.


For a classic golden hue, great for an anniversary or to give to your spouse, you can choose to hole punch your own paper out of 1/8" (shown here) or 1/16" hole punch.


As you can see, there are two frame options available, and both come with and without pink bubbles, so you can choose whatever you like. Both have a ribbon along to bottom so you can type whatever message you like. After scoring and trimming, your finished card will be 4.5x6.25 inches when folded.


Of course, it's not complete until you've assembled a customized envelope in matching font as well.

As with all my quilling tutorial patterns, you won't need a ruler to measure the strips needed. Simply lay your strip on top and score/fold along the indicated lines. Then follow the illustrations and photos to see how they are easily assembled.


If you'd prefer a different size of card or don't want the frames, it's easy to make a few more pieces of confetti to throw around it. I like gluing my confetti at different angles so it really looks like it's fluttering around.


This latest quilling pattern is available in my Etsy shop (10% coupon code is in the caption below). I hope you have a wonderful weekend full of paper scraps on the floor.


I can finally buy my quilling supplies locally, at Precious Memories! They sold out of my book at my first ever quilling demo the other night. My nervousness was completed dispelled by the enthusiastic attendees.

I'd like to celebrate (pun intended) my achievement with a 10% coupon for my Etsy shop. Just enter CONGRATS10 (expires July 31) during your checkout.


Craft Ideas is hosting a giveaway of my book! 3 lucky winners will receive a copy if they enter before 9/30/2014.

Feb 19, 2014

Lark Book: Quilled Wedding Cake Card


Wedding season is just around the corner, and this quilled wedding cake is the dreamy kind I imagined of having for my wedding day, when I was a girl. My real wedding cake was more grounded, but I have a soft spot for idyllic storybook versions.


Books simply don't have enough pages to show every angle of every card, so I'm going to show a couple close ups here. Throughout the 128 pages and 26 projects, I tried to incorporate as many new ways of using quilling strips as I could. See the ornate table surface? Can you believe that was a happy accident? I needed to ensure my table top and bottom strips were straight and even, so I made a spacer. I finally realized the spacer made a wonderful accent to the card and seemed deliberate.


My hubby helped me choose the wedding cake paper - it's textured and looks like frosting with a hint of metallic. Metallic ribbons encircle each tier and adds to the magical ambience.


When designing these patterns from scratch, I often made several versions because color combinations look different in my head than they do in real life. This green and teal version was one of the first. As you can see it's hard to keep a straight quilling strip when gluing such a long strip. I tried building the card from strips and using the teal to encircle the bottoms. Didn't make the cut for me.


Coral pinks/orange hues and chartreuse green have been popular wedding colors lately. I often challenge myself to use bolder color combos or ones that are not my personality. Cutting the cake shape seemed the best way to allow the quilling decor on top really come through unobstructed.


Sometimes I didn't have the right color ribbon to match my quilling strips (and didn't want to buy a whole spool), so I would use a felt marker to color a plain white ribbon.

So although the final pink and silver version is completely in my comfort zone palette, it's simply a classic to me. It also makes for a lovely congratulations card to the newlyweds because paper is traditionally given in the first year - how apt!

Pretty Quilled Cards is launching March 4, 2014 – less than 2 weeks away. Feels like I'm counting down to Christmas!

Nov 20, 2013

Paper Orchid Cards and Party Favor Box

Thanks so much everyone! I've been buoyed by your enthusiasm over my paper orchids. The set is finally done and listed in my Etsy store. I've enjoyed learning about the amazing colors orchids have to offer. Now that they are in my radar, I can't help but notice them in florist shops.

Since I don't have an embosser, I make my own version by cutting the Asian inspired lattice pattern out of paper, then gluing the paper on top of my card. Even my hubby was fooled and had to take a second look, wondering how I achieved the subtle pattern. It's difficult to see the white on white card, but you can see it better with the pink on pale pink card on the right.

It took a bit of time to list this in my store because I wanted to make protective boxes for the cards. This box works for both the horizontal and vertical card. When the cards are nestled inside, it reminds me of peering through the decorative windows in Asian gardens and admiring the view on the other side.

Since I use my blades until they are very dull, I end up plucking/weeding quite a bit with the lattice. So I added very tiny rounded corners to help my machine cut smoothly, making weeding easier - these are bonus files which you can choose to use if you prefer it as well.

As a child I loved attending weddings and collecting the party favors, imagining my own one day. The tapered box in this collection has little feet that raise the box up. To help guests open the lid, there is a half moon tab along the lid lip. I couldn't decide which I liked best - the straight or diagonal placement of the blossom. There are step-by-step photos to assemble every piece you see here.

Thanks for visiting!


Cecelia

Aug 29, 2013

Bride Dress & Groom Tuxedo Party Favor Boxes (SVG, DXF, and PDF file formats)


My bride and groom boxes are on Etsy now! I had to slow down the horses until I finished adding photos of new bows I added to the brides. How can the guys be more decorative than the girls? They're held obediently in place with double-sided tape and guests won't have a problem accessing the treats because they can still open the box from the bottom. I hope I get to see my box designs decorating someone's party one day!

Aug 28, 2013

Bride Dress and Groom Tuxedo Party Favor Boxes

I have a sweet couple of boxes that are almost ready to launch. They took some time to figure out because I wanted to incorporate specific details. I thought I would share a bit of my process here.


I knew I wanted a fuller bridal gown, more ball-like rather than square, the stuff of little girls' dreams. So a hexagon shape was my base, and you can see the progression as the bodice took shape.

I wanted to offer two types of dresses, so chose a straight and crossed style. Having two to choose from means you can have bridesmaids for a shower.


For the guys, I sculpted broad shoulders from a tuxedo that assembles without glue. Again, two different styles - a Windsor knot tie (love that crimp) and a bow tie (not a shoelace method). I couldn't resist a matching hanky in the pocket. I love putting time into small details like this.


These aren't limited to wedding couples. I had quite a smirk on my face making Anastasia Steele's plum dress and Christian Grey's tie, perfect for a 50 Shades of Grey party.

Does this set of new boxes make you think of other occasions?

*** Update *** The boxes are now in my Etsy store ***

Jul 13, 2013

Damask Chair Party Favor Box


Although I'm more of a tomboy than a girly-girl, I did save every wedding party favor as a little girl, dreaming of the day I would marry my sweetheart. I don't know why I have such a thing for boxes, but I do love how it's hiding a small surprise. The ones I love most serve double purpose, whether to be decorative or in this case, to show a guest to their seat.


I used a heavyweight vellum which allows the damask pattern to be seen yet not obstruct the guest's name. A square tag is glued to the front, with a couple's special day and message.


The 1.75" cube has a chair backing that is 4.25" tall. Two boxes can be cut from a single sheet of 11 x 8.5" paper. In this example I've used Silver Stardream cardstock. The font used here is Great Vibes.


Damask patterns have always been used in classic decor in such a broad range, and I struggled for quite some time to have the design be strong enough to hold the name tag. I also think it looks just as complete without the name tag, so it's perfect for occasions other than weddings.

My Damask Chair Box is now available in my Etsy store for instant download. I've saved the files in SVG, DXF, MTC, and PDF formats. Thanks so much for your kind comments!


Apr 24, 2013

Wedding Cake Card by Kelly


I'm not a bling personality, but I have to say this wedding cake card by Kelly, (findingtimetocreate.blogspot.ca) got my attention. It says everything a bride wants their special day to say, an event to remember for all time.

Although the background is neutral and allows the flowers to take center stage, the glitter makes a splashy show all on its own.


Kelly explains in great detail how she made this 3D cake card with glitter and what materials she had to change up to make it work. I love how she explains things so thoroughly, like all her posts on her blog.

Thanks, Kelly, for generously allowing me to show your card on my blog!

Cecelia

Mar 27, 2013

3D Cake by Michelle and Kelly


I simply love seeing my designs come to life in another person's hands. It's wonderful to see the same cut file used in different colors and texture than I imagined.

The first card is made by Michelle of Michelle My Belle Creations. It seems so obvious now that the flowers she used was such an ideal choice. I also like the bling she added using sequins in the upper parts of the swoosh.

The second card is by Krafting Kelly of Finding Time to Create. Ah, these are the times I wish I had a ready supply of scrapbook paper in my shelf. I love how she placed the initial right on top of the cake - like one of those special candles. Again - why didn't I think of that?

Thank you for playing with my files, Michelle and Kelly!

Mar 19, 2013

3D Cake Collection

I'm quite excited to offer these 3D paper cakes, easily customizable for a birthday, wedding, or anniversary in my store.


Here's an example of a single layer chocolate cake with white circles icing (I used white vinyl). I've seen many examples of polka dotted icing on cakes, and thought it would great to have a matching background.


Add a second layer of cake on top and some swooshes to make a classic celebratory statement. I designed a subtle backdrop pattern made of diamonds and left a blank plaque above for whatever occasion you need. 

My favorite has to be the 3-tier cake. Somehow the more tiers it has, the more fun it is. I decorated it with ribbon and matched the background using a scalloped edge. The chocolate shavings on top were made of quilling paper, but you can just as easily use any brown paper with 1/8" width.
What cake would be complete without a cake box? I used some scrap plastic left over from some packaging and glued it with Scotch Quick Dry glue. I also added some easy-open tabs so you won't have to struggle prying open a well-fitted box. All the cards are 5x7 inches.
Michelle of MichelleMyBelle Creations made an awesome purple cake with flowers, sequins, and textured backgrounds. I like how she added a bow to the stand which makes it more dimensional.

Please let me know what you think in the comments section!

Oct 7, 2012

3D Cake Card

Here's an idea I've been toying with – a paper 3D cake. I love the feel ribbon instantly gives to cakes. The chocolate shavings screamed to be made out of quilling strips. The platter/stand is cut from metallic green card stock. I even made a cake box to protect it, since it'll get crushed in an envelope.
Each tier is made separately in case they need to be varying paper stocks representing different flavors. This 3-tier cake is obviously for a wedding, but take away the top 2 and there'll be more room for a message for birthdays or anniversaries.

Jan 14, 2012

3D Paper Ball with Hearts and Arrows

Beware of Cupid’s shooting arrows! It was a great discovery my first time to use an ink pad on the edges of my paper ball decorations to add dimension. I realized dragging the ink pad across the arrow would make it appear as if Cupid had just let it fly, especially when it caught on the edges.

Version 1 is easy to put together since it’s a single sheet of paper. Simply use beading wire, fishing line, or string to thread from the bottom hole, then thread each arc at the top. A rolled paper straw in the middle keeps the ball fully inflated. A scalloped circle finishes the top and bottom and the beads are optional. Version 2 allows you to combine two different papers, of course.

Part 4 of upcoming Valentine collection on Etsy.

Jan 11, 2012

Yin Yang Valentine Card


I originally designed this card as a wedding invitation for dear friends. I wanted to give a subtle nod to their Asian background.

The interlocking Yin Yang design with Japanese flower motif opens up to reveal two interlocking hearts and a message for your Valentine. Overlapping two different colors of paper allows you to customize this card for weddings or anniversaries as well.

Part 3 of my Valentine collection, soon to be released on Etsy.

Jan 7, 2012

Valentine Hearts Gift Box


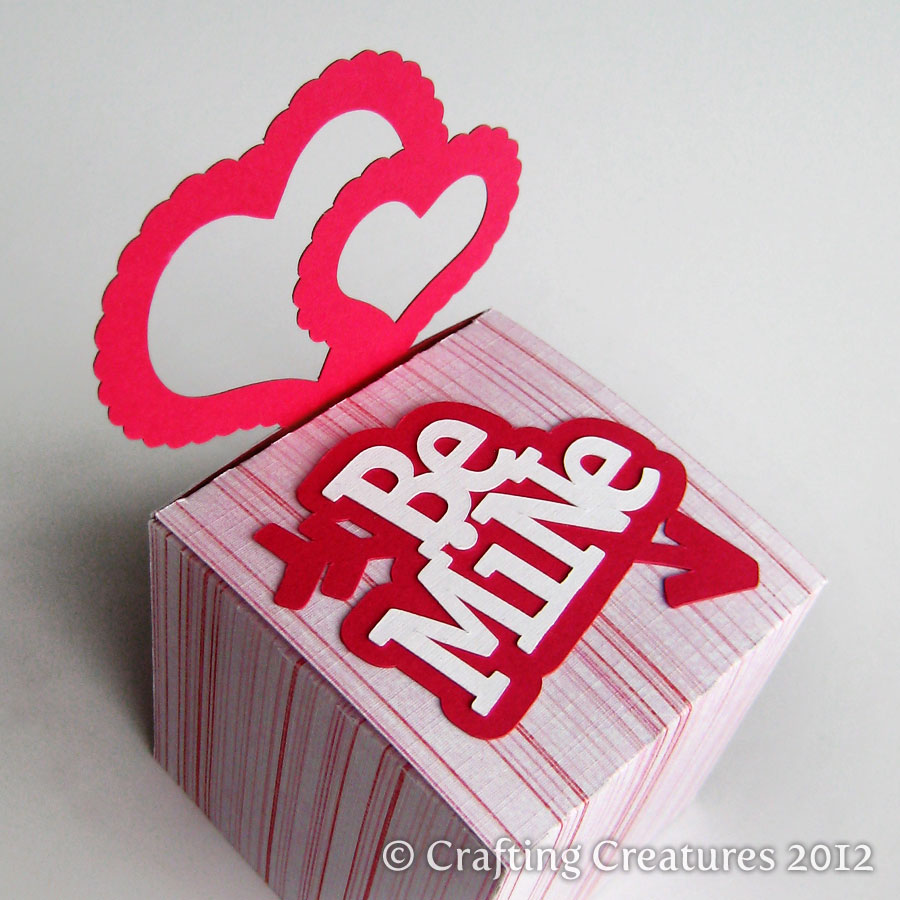
Classic cube with overlapping scallop-edged hearts. Simple and quick to make, this box can also be used for weddings or anniversaries. Who says Valentine's Day is just one day of the year?

Part 2 of upcoming Valentine's Day collection, soon to be offered on my Etsy store.

Mar 25, 2011

Guest Post on The Creative Place


I was so inspired by Ashley's blog, The Creative Place, a treasure chest of DIY ideas. By coincidence I noticed her call for guest post submissions and decided to make and submit DIY instructions for my wedding party favor. My humble thanks, Ashley!

Jan 25, 2011

DIY Party Favor


Finally edited the remaining photos from our nephew’s soccer themed baptism. This is such an easy to make party favor. I remember savoring hickory smoked almonds on an airplane and the wedge shape has always stuck in my head because of it’s minimalism. It uses the least amount of paper, provides maximum amount of volume, yet requires the least amount of effort to make by hand. There are no tabs to cut as for boxes, the shape is very pleasing and unusual, and provides a nice surface for a message.

I bought my translucent vellum at Opus on Granville Island: .50/sheet (discount over 10 sheets), at 48lb. Other options I considered were:

  • DeSerres: $8.95 at 32 Text weight (too thin)
  • Avalon Stationary: .70/each, 80lb Cover weight (too thick)
  • Coast Paper Cash and Carry: minimum $25 (too much stock left over)

To make the party favor:

  1. Cut a sheet of 8.5″x11″ into quarters. Wrap the length around an empty toilet paper roll to help you line up the edges, and use double sided tape or glue to adhere the overlap.
  2. Pinch the top opening.
  3. Adhere one end of the tube.
  4. Pinch the other opening in a perpendicular direction.
  5. Fold over edge.
  6. Use a 1/8″ hole punch in the middle for a ribbon.


I've just discovered The DIY Club and hope readers there will enjoy this project. Check it out!