Showing posts with label anniversary. Show all posts

Jul 18, 2014

Quilled Champagne Congratulations, A New Tutorial Pattern!


My friends got engaged and I wanted to quill them something to commemorate the happy occasion. Champagne glasses immediately came to mind and then I wondered what to put around the clinking glasses — confetti and streamers of course!


I think of pink for a rosy congratulations, whether for a graduation or even an invite to "eat, drink, and be merry". The example shown here has the pink dots ready-to-print along with the frame.


For a classic golden hue, great for an anniversary or to give to your spouse, you can choose to hole punch your own paper out of 1/8" (shown here) or 1/16" hole punch.


As you can see, there are two frame options available, and both come with and without pink bubbles, so you can choose whatever you like. Both have a ribbon along to bottom so you can type whatever message you like. After scoring and trimming, your finished card will be 4.5x6.25 inches when folded.


Of course, it's not complete until you've assembled a customized envelope in matching font as well.

As with all my quilling tutorial patterns, you won't need a ruler to measure the strips needed. Simply lay your strip on top and score/fold along the indicated lines. Then follow the illustrations and photos to see how they are easily assembled.


If you'd prefer a different size of card or don't want the frames, it's easy to make a few more pieces of confetti to throw around it. I like gluing my confetti at different angles so it really looks like it's fluttering around.


This latest quilling pattern is available in my Etsy shop (10% coupon code is in the caption below). I hope you have a wonderful weekend full of paper scraps on the floor.


I can finally buy my quilling supplies locally, at Precious Memories! They sold out of my book at my first ever quilling demo the other night. My nervousness was completed dispelled by the enthusiastic attendees.

I'd like to celebrate (pun intended) my achievement with a 10% coupon for my Etsy shop. Just enter CONGRATS10 (expires July 31) during your checkout.


Craft Ideas is hosting a giveaway of my book! 3 lucky winners will receive a copy if they enter before 9/30/2014.

Nov 20, 2013

Paper Orchid Cards and Party Favor Box

Thanks so much everyone! I've been buoyed by your enthusiasm over my paper orchids. The set is finally done and listed in my Etsy store. I've enjoyed learning about the amazing colors orchids have to offer. Now that they are in my radar, I can't help but notice them in florist shops.

Since I don't have an embosser, I make my own version by cutting the Asian inspired lattice pattern out of paper, then gluing the paper on top of my card. Even my hubby was fooled and had to take a second look, wondering how I achieved the subtle pattern. It's difficult to see the white on white card, but you can see it better with the pink on pale pink card on the right.

It took a bit of time to list this in my store because I wanted to make protective boxes for the cards. This box works for both the horizontal and vertical card. When the cards are nestled inside, it reminds me of peering through the decorative windows in Asian gardens and admiring the view on the other side.

Since I use my blades until they are very dull, I end up plucking/weeding quite a bit with the lattice. So I added very tiny rounded corners to help my machine cut smoothly, making weeding easier - these are bonus files which you can choose to use if you prefer it as well.

As a child I loved attending weddings and collecting the party favors, imagining my own one day. The tapered box in this collection has little feet that raise the box up. To help guests open the lid, there is a half moon tab along the lid lip. I couldn't decide which I liked best - the straight or diagonal placement of the blossom. There are step-by-step photos to assemble every piece you see here.

Thanks for visiting!


Cecelia

Mar 27, 2013

3D Cake by Michelle and Kelly


I simply love seeing my designs come to life in another person's hands. It's wonderful to see the same cut file used in different colors and texture than I imagined.

The first card is made by Michelle of Michelle My Belle Creations. It seems so obvious now that the flowers she used was such an ideal choice. I also like the bling she added using sequins in the upper parts of the swoosh.

The second card is by Krafting Kelly of Finding Time to Create. Ah, these are the times I wish I had a ready supply of scrapbook paper in my shelf. I love how she placed the initial right on top of the cake - like one of those special candles. Again - why didn't I think of that?

Thank you for playing with my files, Michelle and Kelly!

Mar 19, 2013

3D Cake Collection

I'm quite excited to offer these 3D paper cakes, easily customizable for a birthday, wedding, or anniversary in my store.


Here's an example of a single layer chocolate cake with white circles icing (I used white vinyl). I've seen many examples of polka dotted icing on cakes, and thought it would great to have a matching background.


Add a second layer of cake on top and some swooshes to make a classic celebratory statement. I designed a subtle backdrop pattern made of diamonds and left a blank plaque above for whatever occasion you need. 

My favorite has to be the 3-tier cake. Somehow the more tiers it has, the more fun it is. I decorated it with ribbon and matched the background using a scalloped edge. The chocolate shavings on top were made of quilling paper, but you can just as easily use any brown paper with 1/8" width.
What cake would be complete without a cake box? I used some scrap plastic left over from some packaging and glued it with Scotch Quick Dry glue. I also added some easy-open tabs so you won't have to struggle prying open a well-fitted box. All the cards are 5x7 inches.
Michelle of MichelleMyBelle Creations made an awesome purple cake with flowers, sequins, and textured backgrounds. I like how she added a bow to the stand which makes it more dimensional.

Please let me know what you think in the comments section!

Jan 14, 2012

3D Paper Ball with Hearts and Arrows

Beware of Cupid’s shooting arrows! It was a great discovery my first time to use an ink pad on the edges of my paper ball decorations to add dimension. I realized dragging the ink pad across the arrow would make it appear as if Cupid had just let it fly, especially when it caught on the edges.

Version 1 is easy to put together since it’s a single sheet of paper. Simply use beading wire, fishing line, or string to thread from the bottom hole, then thread each arc at the top. A rolled paper straw in the middle keeps the ball fully inflated. A scalloped circle finishes the top and bottom and the beads are optional. Version 2 allows you to combine two different papers, of course.

Part 4 of upcoming Valentine collection on Etsy.

Jan 11, 2012

Yin Yang Valentine Card


I originally designed this card as a wedding invitation for dear friends. I wanted to give a subtle nod to their Asian background.

The interlocking Yin Yang design with Japanese flower motif opens up to reveal two interlocking hearts and a message for your Valentine. Overlapping two different colors of paper allows you to customize this card for weddings or anniversaries as well.

Part 3 of my Valentine collection, soon to be released on Etsy.

Jan 7, 2012

Valentine Hearts Gift Box


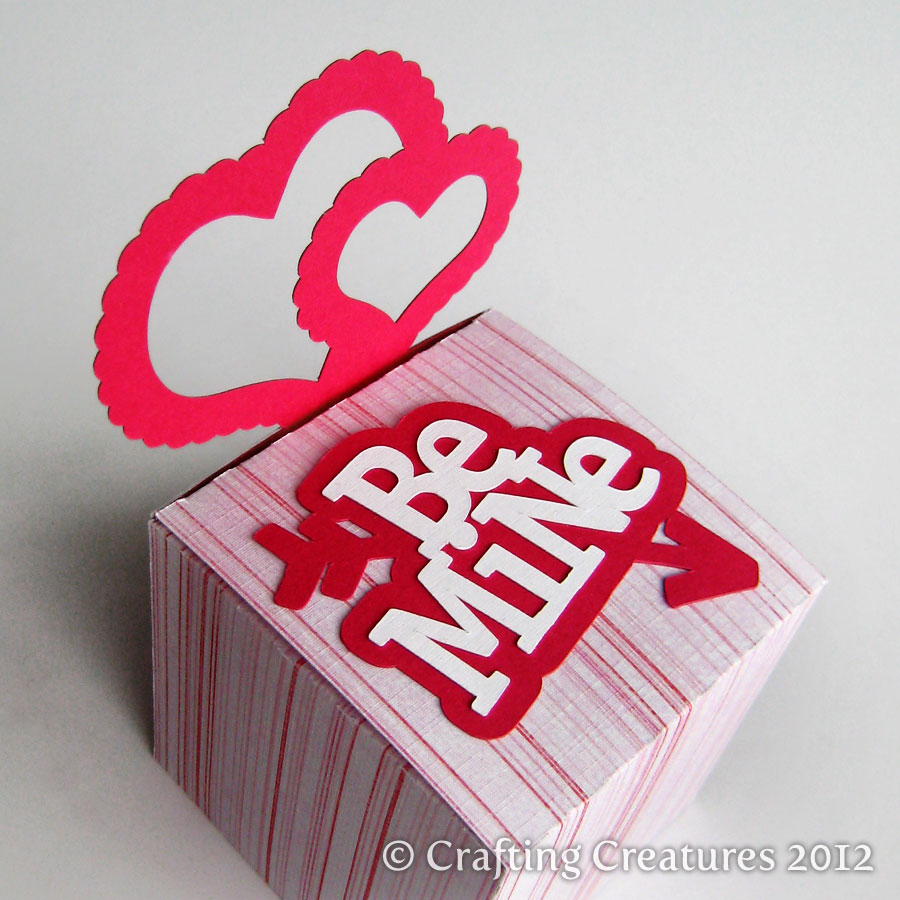
Classic cube with overlapping scallop-edged hearts. Simple and quick to make, this box can also be used for weddings or anniversaries. Who says Valentine's Day is just one day of the year?

Part 2 of upcoming Valentine's Day collection, soon to be offered on my Etsy store.