Showing posts with label quilling. Show all posts

Feb 5, 2021

Quilling Valentine’s Day Card – 3 Easy Heart Pattern Ideas with FREE PDF Template

If you’re new to quilling and intimidated to start, then try this easy Valentine’s Day card, using basic quilling shapes. Watch my tutorial or read more about it below.


Page 1 has two tinted hearts ready for your quilling, and page 2 has the added message of “be mine, valentine!”, so you don't have to worry about outlines or centering elements on the card.

Quilling Hearts Card Design Pattern


Steps:

Step 1:  Download my free PDF pattern, and print it onto card stock

Step 2: score vertically in half with a score board or a dried up pen

Step 3: cut horizontally, fold, then unfold so it lays flat on your desk

Paper used: conventional quilling paper, 1/8 inch wide


Quilling Heart for Valentine Card - basic scroll

Card #1: Quilling hearts with S-Scrolls and C-Scrolls

This card is based on a birthday card I made for my mom in 2007, inspired by a store in the mall called La Vie En Rose. She loved it so much she kept it on her fridge for years.

Length of S- and C-scrolls: 4” long


Quilling Heart for Valentine Card - heart design and loose scroll

Card #2: Quilling hearts with Loose Scrolls

Loose Scrolls look like question marks to me and are combined with easy heart outlines for this card.

If you struggle with accidental glue globs, what I do is set one end down first while keeping the other end up in the air. Then I set the other side down. This way your eyes are not struggling to look at so many crucial areas at the same time.

For more tips about glue, watch my video tutorial about Quilling Glue Basics - 5 Tips

Length of Loose Scrolls: 3” long

Length of Hearts: 1.5 and 2” long


Quilling Heart for Valentine Card - flower petals

Card #3: Quilling Flowers and Leaves

For this card, I used a die cut punch I bought at the dollar store to make easy leaves. After punching this flower,  I cut each petal loose, scored them in half with my needle tool, then folded – BAM! Your leaves are ready for your bouquet.

Length of Closed Coil Flowers: 2” and 3” long


Quilling Pillow Box Envelope


Pillow Box Envelope

Protect your quilled greeting card with a puff of air using my FREE pillow box envelope pattern. Read more.

Jan 22, 2021

How to Make a Quilling Circle Template Board by Hand - 5 Easy DIY Ideas - Free PDF Pattern

My Circle Template Wish List

We quillers can buy circle templates from Quilled Creations, and dollar stores, but they all have pros and cons. So I designed my own DIY circle template with the following wish list:

  • 4-6 multiples of the same size circles 
  • diameter shown in both inches and millimetres
  • 10 increments between sizes from 3/16 to 1 inch (5 to 25 mm)
  • deep enough to prevent coils from springing out
  • solid template, so it doesn’t bounce around
  • ruler
  • length of quilling paper strip needed to fill the circle
The paper length is my favourite feature because now I just have to write one number down when I’m designing patterns. The paper length is only a suggested length, because it’s based on the conventional quilling paper I have in MY craft room. If you’re using thicker paper, a different tool, or if you want fuller or looser coils, then these lengths might not work for you. In that case, then simply scratch out my measurement, and write down your own.


Watch my tutorial showing how to make a Quilling Circlet Template:


How to Make a Quilling Circle Template Board

Step 1: Download my free PDF template 

Step 2: Print onto card stock

Step 3: Choose a method below

Quilling Circle Template


Method 1: 

Make circles out of quilling paper, using a crochet hook or any other item with the exact diameter needed to match the circle. Ensure your strip width is shallower than the coil you plan to place inside, so you can still pick up your coil again with tweezers.

Quilling Circle Template - Crochet Hook


Method 2: 

Nylon or metal flat washers are inexpensive items at a hardware store. Match up the inside circumference and glue them down with Scotch Quick-Dry Adhesive, ideal for gluing metal or plastic embellishments. I only dab a little glue to avoid it squishing out from the bottom. The depth of the washers seemed just right for 1/8” width quilling paper strips. I even stacked two nylon washers together for 1/4” width coils, and it seemed to hold.

Quilling Circle Template - Washers


Method 3: 

Mat board strips cut to 3/8 wide x 5 inch long fit in between each row perfectly. Glue down these “fences”, and allow your coils to expand between them.

Quilling Circle Template - Mat Board

Method 4: 


Adhesive foam squares from the dollar store placed on either side of a circle will also act as a fence to keep your coils contained. 

Quilling Circle Template - Foam

Method 5: 

Circle cutters such as NT Cutter or Olfa will cut a clean circle out of your card stock. To raise the template off your work surface, simply add mat board strips underneath.

Quilling Circle Template - Cutters


Although these 5 methods above will work, I will readily admit I prefer cutting my circle template with a Circuit Explore Air cutting machine. I plan to go into further detail in a future tutorial and video.

I hope you like my Quilling Circle Template Board – leave me a comment below and tell me what is your favourite template. If you have a way of making yours, please share your ideas with everyone in the comments below so we can all learn together.

Jul 3, 2020

Slotted vs Needle Quilling Tool - How to Use and Why

Slotted vs Needle Quilling Tools - how to use and why

Slotted vs Needle Quilling Tools - How to Use and Why

What's the difference between these two tools, and which one should you get, and more importantly, why? The answers to all these questions are shown in my latest tutorial video, and I'll be breaking down the steps to achieve success with either tool.

Slotted Quilling Tool Tips:

  • Slip your strip into the slot, aligning the paper end to your tool (no overhang)
  • Turn your handle; either left or right, whichever direction feels comfortable
  • Use your index fingers to keep edge aligned
  • Use your thumb to apply gentle pressure against the coil to prevent unravelling
  • PUSH the finished coil off, never PULL the coil, or else you'll get a tornado
  • Flatten the coil to align the edges before allowing it to unwind
  • Slotted quilling tools will show a crimp in the middle, but you can hide it by inserting a needle tool, and rubbing the crimp until it's smoother

Needle Quilling Tool Tips:

  • Press the needle against the paper into your index finger
  • Rub the paper with your thumb and the friction will make the paper wind around the needle until it catches itself
  • If your fingers are dry, moisten very lightly to achieve friction, which will help the paper catch
  • Flatten the coil to align the edges before allowing it to unwind
  • Needle quilling tools will have a smooth innermost coil


Apr 14, 2020

How to Cut Quilling Strips with a Cricut Explore

How to Cut Quilling Strips with Cricut: Free SVG Pattern Files


How to Cut Quilling Strips with a Cricut Explore


Cutting your own quilling paper strips with an electric cutting machine is really quick and easy, and it’s how I’ve been cutting my own paper for many years now. I had to cut my own thicker paper for “on edge quilling” or "quillography" projects because venders just didn’t offer it until the last couple of years.

Ever since I made cutting files for myself, I’ve been giving them away on my blog. If you’ve downloaded my cutting files in the past, then you’ll want to download my updated files because I’ve made significant improvements on them. Watch my video tutorial to see how the cutting path has been made as efficient as possible.


Download Free Cutting Quilling Strip Files

Quilling Paper Strips - Cut by Hand


My files are created in 5 widths for:

  • inches: 1/16, 1/8, 1/4, 3/8, 1/5
  • mm: 1, 2, 3, 5, 10


The following machines can import SVG (Amazon affiliate links): 


The following machines can import DXF:

  • Silhouette: Cameo, Curio, SD 


Method 1 - Cut Quilling Strips with Margins

Cut your strips with margins on either side and they will never get tangled. After tearing them off, you'll need to trim the ends to make them clean.


How to Cut Quilling Strips with Cricut: Method 1 With Margins

Method 2 - Cut Quilling Strips with Fringe

Leave a margin on one side and your strips will still be manageable. There is less wastage than Method 1, and I usually use this method on scrap pieces rather than full sized pieces of paper.


How to Cut Quilling Strips with Cricut: Method 2 With Fringe

Method 3 - Cut Quilling Strips Without Margins

There is no wastage with this method of cutting, and the strips will all be individually cut.


How to Cut Quilling Strips with Cricut: Method 3 Without Margins

Bonus - Happy Birthday Message

Decorate a birthday gift with a unique twist using letters on a ribbon of quilling!


Mar 31, 2020

3 Ways to Cut Quilling Strips by Hand - Free Pattern and Tutorial

cut quilling strips by hand - free pattern and template

3 Ways to Cut Quilling Strips by Hand

In my latest free tutorial, I’ll be showing you step-by-step, a couple of methods of how to cut your quilling strips by hand. Download my free printable PDF template. There’s also bonus that I’m sure any quiller will enjoy!


I've made the following widths for DIY Quilling Strips:

Inches: 1/16, 1/8, 1/4, 3/8, 1/2

Millimetre: 1, 2, 3, 5, 10


Quilling Paper Strips - Cut by Hand


Materials:

sharp craft knife (Method 1 + 2)
metal ruler (Method 1 + 2)
cutting mat (Method 1 + 2)
rotary cutter (Method 3)

Method 1 - Cut Quilling Strips with Margins

Print the template directly onto your paper. Cut from the printed line at the top to the bottom, leaving margins. These margins help keep your paper extremely tidy. 


Method 2 - Cutting without margins

If you don’t want to waste any scrap of paper, you can cut edge to edge. Print the template on regular paper and cut off both “rulers”. Tape these rulers to your cutting mat, leaving enough space for the full length of your paper in between. Cut edge to edge, with no wastage.
You would never want to print the markings onto your paper, and then cut all the way, because the markings would show on your quilling strips, and that just won’t do!


Method 3 - Rotary Cutter

Watch the video to see how to find your exact cutting edge. You'll also see how to make a jig for cutting the same strip width without needing to look at your markings at all. Discover how to make a fringe so you can trim off the excess markings.


Bonus

Type a message onto your quilling strip, then cut it out. Wrap a gift or start quilling with your customized ribbon. It’s like a message in a bottle!

Do you have any you’d like to share with everyone else? If so, I’d love to hear about it – please leave a comment below.


Oct 29, 2019

Quilling Uppercase Letter Z - Dragonfly Pattern and Tutorial


Quilling Uppercase Letter Z - Dragonfly Pattern and Tutorials


Quilling Uppercase Letter Z - Dragonfly Pattern and Tutorials


If I'm ever in a rush to fill a monogram, but still want it to look like I took a lot of time to make it, I fill it with C- and S-scrolls because they fill up the space quickly and easily. You don't even have to use a ruler because having a variety of small and large strips fill in corners or spaces naturally. 

In my latest tutorial video, I also share tips on the way I look at my pieces with fresh eyes, how to balance your quilling even when items have already been glued down, and what to do if the colors you used don't turn out the way you intended.

I want to give a huge THANK YOU for giving me your wonderful encouragement for the past 2 years, as I've created this series of tutorial videos. This idea had been in my head  for years, but I kept making excuses not to go through with it. Your kind comments gave me the momentum to keep going and growing with each video I made. Although the purpose was to teach you the techniques I use, I was just as much a student, learning how to improve myself with each lesson. I would never have reached this far without all of you!

With gratitude,
Cecelia


Aug 27, 2019

Quilling Lowercase Letter u - How to Outline Tutorial for a Monogram


Quilling Lowercase Letter u - How to Outline Tutorial for a Monogram


It's straightforward to quill the outline of the lowercase letter u, and then it throws you some curveballs. Watch how to outline the lowercase letter u in my latest tutorial.

Aug 13, 2019

Tearing vs Cutting Quilling Strip Ends - Comparison and Tips

quilling tearing vs cutting strip ends


Tearing vs Cutting Quilling Strip Ends - Comparison and Tips

Is it better to tear or cut your quilling strip ends before you glue the end down? I've been asked that question many times, so I thought I'd share a video about it. 

My tutorial video shows you some close up photos, comparing the two results, so you can decide how you want to approach your quilling. I also share some tips on how to minimize the gap so it's less distracting, if you are indeed distracted by this small detail.

Aug 6, 2019

Quilling Lowercase Letter s - How to Outline Tutorial for a Monogram

quilling lowercase letter s - how to outline monogram tutorial and pattern


Quilling Lowercase Letter s - How to Outline Tutorial for a Monogram


The winding curves of the lowercase letter s can be tricky, but you'll see how to tackle them in my latest tutorial.


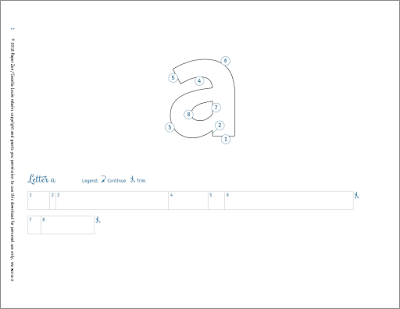
Download a free template and try quilling the Lowercase Letter a


Quilling Lowercase Letters can be purchased in my shop


Review of Quilling Lowercase Letters:


May 7, 2019

Quilling Fringed Flower #3: How to Make Gerbera Tutorial and Pattern

quilling fringed flowers gerbera tutorial pattern


Quilling Fringed Flower #3: How to Make Gerbera Tutorial and Pattern


Learn how to make fringed gerbera flowers using a slotted quilling tool. Quickly add highlights of color, without needing to add another colored strip to your fringed petals. Subtley color your blossoms beyond the color you've cut. Then add them all to a blank greeting card, protected by a pillow box card.


Free download includes
• SVG file for cutting with a machine
• PDF greeting card


quilling fringed flowers gerbera tutorial pattern SVG cut file


quilling fringed flowers gerbera tutorial pattern SVG cut file greeting card


Watch the Quilling Fringed Flowers #3 tutorial video


Previous Quilling Fringed Flowers Tutorials:

Apr 23, 2019

Quilling Curve Challenge - Day 7

7 Day Quilling Curve Challenge


Quilling Curve Challenge – Day 7

How have you improved your quilling in the past 7 days? 

Did you practice curving these 6 shapes using my 3 simple techniques? Did you see improvement? Were you able to achieve the smooth arcs more quickly?

In this video, I'm going to show you how to tackle the challenge using conventional quilling strips and a standard needle tool, just so you know you can do it regardless of type of paper or tools. Heck, you can even make shapes with a toothpick and ruled paper!


Download the PDF template, watch the video tutorial, then tag me #7dayquillingchallenge and/or @paperzen_cecelialouie – I'd love to see what you make!


Mar 19, 2019

Quilling Lowercase Letter f - How to Outline Tutorial


Quilling Lowercase Letter f - How to Outline


It's easy to tame the curves of the lowercase letter f. To know the exact length of each strip, simply lay your paper on top my of PDF e-book of patterns Quilling Lowercase Letters.

Watch my tutorial video showing how to outline the Lowercase Letter f, using softening and rubbing techniques to shape the curves. 


Feb 13, 2019

Quilling Fringed Flower #1: Dandelion Tutorial and Pattern

Quilling Fringed Flower #1: Dandelion Tutorial and Pattern


Quilling Fringed Flower #1: Dandelion Tutorial and Pattern


The first time I saw a fringed flower, I fell in love immediately. I had no idea quilling could take on such dimension. I knew then and there, someday I would buy an electric cutter and make flowers to my heart's content! 

In this video (the first of a series of fringed flowers), I'll be showing how to 
  • fringe by hand
  • fluff your petals to give them life
  • make a smaller bud
  • mix colors for a multicolored pom-pom or fireworks
  • add them to a free printable card

Quilling Fringed Flower #1: Dandelion Tutorial and Pattern Card

Dec 12, 2018

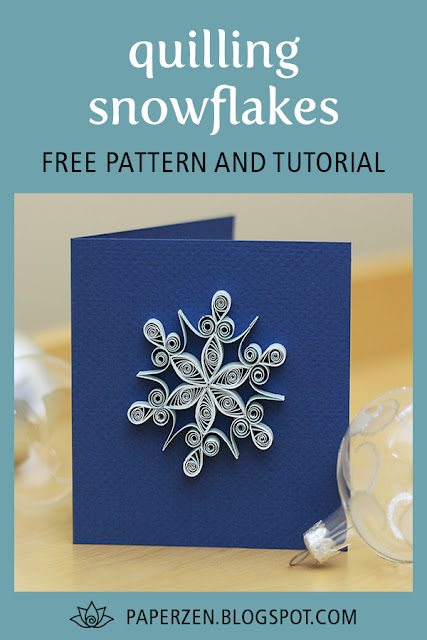
Quilling Snowflakes - Free Pattern and Tutorial

quilling snowflake pattern template card


Quilling Snowflakes - Free Pattern and Tutorial

Do you want to make a quick and easy snowflake? It's easy to line everything up using my free pattern and template.

As with all my patterns, you can simply lay your strip on top of my template and cut it to the right length – no rulers needed!

Quilling Snowflake Grid Pattern Template Tutorial

Quilling Snowflake Template - Free Pattern


Quilling Snowflake SVG Pattern

Quilling Snowflake Template - Free SVG Files


Nov 21, 2018

Quilling Glue Basics - 5 Helpful Tips


Quilling Glue Basics - 5 Helpful Tips Tutorial


Quilling Glue Basics - 5 Helpful Tips


Do you have a hard time with glue showing on your quilling? In this video I’m going to share all the gluing tips I’ve learned since I started in 2006.

Oct 31, 2018

Free Pillow Box Template for Protecting Quilling Cards

Protect Your Quilled Cards with a Cushion of Air

quilling pillow box free template tutorial how to protect

Do you want to shield your precious quilling as you hand deliver a greeting card? Then I have a simple solution for you!

In the past, I've simply used an extra large envelope, letting the excess size accommodate the bulk of the quilling strips. The bulge was not great, but it got the job done fast. I did worry about squishing more fragile quilling designs though, because obviously the envelope is touching my quilling as it's going in and out.

I've also purchased sturdy boxes designed for jewelry to offer great protection for mailing. You can watch the video I made about it here. It was certainly more expensive to buy those boxes, and I'd do it for a special occasion like a wedding or for mailing; but I had to buy several of them at a time from a store that I don't visit often, which meant they sat in my closet, taking up storage space.


quilling pillow box free template tutorial how to protect

So imagine having a quick envelope on hand that completely surrounds your quilling with a puff of air! I'm talking about a simple pillow box, which looks just as it sounds. It has minimal gluing and tabs, making assembly quick and easy. The curved side flaps automatically force the paper away from your quilling, making sure nothing is touching your quilling.


Since I'm making a series of smaller cards showing how to quill Lowercase Letters, this is the perfect time to introduce this free template to you for your projects. This template is customized to fit a 4.25 x 5.5 inch card, which is exactly a quarter of a letter-size sheet of card stock.

Watch my YouTube Video or follow these directions:

  1. Download the template:
    a) PDF file for hand cutting or
    b) SVG file for electric cutting machine (Cricut Explore or Silhouette with applicable software).
  2. Score along the dotted lines. If you're cutting by hand, you can use a dried up pen or scoring tool.
  3. Cut along the solid lines.
  4. Always pre-fold your scores lines to make it easier on yourself later.
  5. Apply glue along the tab, and glue the pillow box together.
  6. Fold down one side (it doesn't matter which one you do first).
  7. Insert your 4.25 x 5.5 inch card and fold the other side down. All the flaps are notched so it's easy to open.
Quilling Envelope - Pillow Box Template