Showing posts with label 3D. Show all posts

Jun 9, 2020

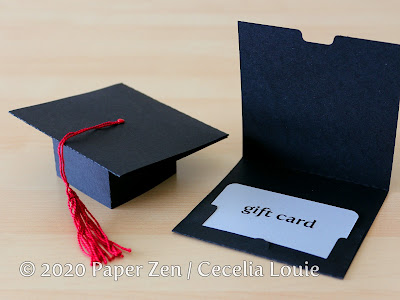
Grad Cap Pop Up Card - Free SVG and PDF Template

Grad Cap Pop Up Card - SVG PDF Template Pattern

Grad Cap Pop Up Card - Free SVG and PDF Template


A nephew of mine is graduating this year, and like so many others, he won't be able to have a typical grad ceremony due to pandemic isolation restrictions. 


Grad Cap Pop Up Card - Gift Card - SVG PDF Template Pattern


So I designed this grad cap card that pops up and sits at a jaunty angle. It has a pocket to hold money, a gift card, or a special photo.


Download my free SVG file to cut on your Cricut or Silhouette cutting machine, or cut it by hand with a the PDF file:


Follow the assembly tutorial here:


Sep 3, 2019

Paper Dragonfly and Lotus Flower Party Favor Gift Box - 3D SVG Cut File

Paper Dragonfly and Lotus Flower Party Favor Gift Box - 3D SVG Cut File


Paper Dragonfly and Lotus Flower Party Favor Gift Box - 3D SVG Cut File

Whenever I see a dragonfly, I feel very lucky that day. They’re so mesmerizing and fleeting.

Oct 22, 2014

Bee Party Favor Gift Box (SVG, PDF files)


I've been a busy bee, making the latest creature in my party favor box collection, based on my first Ladybug.


His stripes are all held together with just two brads on the side.


My favorite part is how the vellum wings stick up all on their own.


As with all the boxes in this series, the bee is a good fit in my palm. He's now available in my shop.


Oct 5, 2014

Snail Party Favor Gift Box


I'm having way too much fun with these box ideas right now - I can't seem to stop the ideas. Here's my latest, a snail box, complete with slime trail too!


This idea came to me when I bought my first ever box of brads by Recollections, called Metallic Mini Circles. The gold one came tumbling out and boom! I thought of shells.


Even though I rounded the antennae up for the ladybug box, I found it didn't really add much nuance to the box. In the case of the snail though, the added googly eyes really makes it!


I really wanted to capture the spiral of a snail's shell. It seems so simple and obvious that all it took was inserting the brad into each flap – quite fun to make them come together.


And one last detail that just could not be overlooked - a trail of slime, made of clear plastic.


It's a good hand size for storing treats for your guests. The Snail Box is now listed in my shop.

Oct 1, 2014

Turtle Party Favor Gift Box


After making the ladybug box, it just seemed logical to make this turtle box, complete with accented mole. I think my nephews would prefer making this guy, as the ladybug is likely too girly for them.


Nov 20, 2013

Paper Orchid Cards and Party Favor Box

Thanks so much everyone! I've been buoyed by your enthusiasm over my paper orchids. The set is finally done and listed in my Etsy store. I've enjoyed learning about the amazing colors orchids have to offer. Now that they are in my radar, I can't help but notice them in florist shops.

Since I don't have an embosser, I make my own version by cutting the Asian inspired lattice pattern out of paper, then gluing the paper on top of my card. Even my hubby was fooled and had to take a second look, wondering how I achieved the subtle pattern. It's difficult to see the white on white card, but you can see it better with the pink on pale pink card on the right.

It took a bit of time to list this in my store because I wanted to make protective boxes for the cards. This box works for both the horizontal and vertical card. When the cards are nestled inside, it reminds me of peering through the decorative windows in Asian gardens and admiring the view on the other side.

Since I use my blades until they are very dull, I end up plucking/weeding quite a bit with the lattice. So I added very tiny rounded corners to help my machine cut smoothly, making weeding easier - these are bonus files which you can choose to use if you prefer it as well.

As a child I loved attending weddings and collecting the party favors, imagining my own one day. The tapered box in this collection has little feet that raise the box up. To help guests open the lid, there is a half moon tab along the lid lip. I couldn't decide which I liked best - the straight or diagonal placement of the blossom. There are step-by-step photos to assemble every piece you see here.

Thanks for visiting!


Cecelia

Sep 15, 2013

Paper Orchid Birthday Card


My wonderful neighbor loves orchids and receives them as gifts. For his birthday, I wanted to make a paper orchid and used my own for inspiration.


I scanned and traced the petals, reducing them to 25%, then cut out with my Silhouette die cutter. Next I added color with a marker and water color paints. Using a dried out ballpoint pen, I scored the middle vein and curled the petals. After stacking and gluing the layers together, the blossom simply comes to life.


I poked a hole in the middle of the smallest bud and inserted the end of the floral wire, adding white glue to hold it in place. I then glued the open blossoms to the wire, ensuring my glue coated the wire thoroughly.


My favorite part is the delicate pair of curly wisps in the center of the flower. 


Then I cut two leaves and manually scored the vein with a dried up ballpoint pen. The pot is made of 3 layers of metallic copper card stock and floats a bit due to adhesive foam dots on the back. It was great having my real plant as a visual reference, because it helped me realize I should glue the items asymmetrically, not all centered. I believe it's these small subtleties that makes a piece.


I have moved my plant throughout the room, depending on my needs, and the stems would gently wave up and down, heavy with the weight of so many blossoms. I deliberately left the wire unglued to his birthday card, and as I place it on a table, it also gently waves, just like the real thing - so fun to watch! The blooms are cut from 65lb paper, so it's sturdy and gives just the right amount of weight on the wire to make it bob.


By the way, I'm often asked how I managed to have 4 new stems bloom. This is my first orchid and I feared it would remain the desolate stick with 2 leaves I often see in homes. My secret? I have a worm condo and fed my orchid the worm tea.


My orchid files are available via my Etsy store. I also include larger sizes for other greeting cards and a tapered gift box, perfect as a wedding party favor.

Jun 16, 2013

Happy Father's Day (3D die cut card)

My dad wears a ratty, tattered vest and even though I've given him new ones, he still keeps wearing the old one anyway. He doesn't wear a bow tie, but I think he'll get a kick out of this card anyway.


I've been experimenting in the realm of "printables" and this is made of 3 pieces - the bow tie, shirt, and vest, cut from 1 sheet of letter-size paper on 80lb cover stock. It was fun to shade the bow tie and give it a sense of 3D while really giving a 3D shape. Details in the buttons and stitching was a cinch to print. It helps keep the vest flaps down when the card is closed. I've written my message under the shirt, which is removable.


Somehow I quite like the back as well simply for its minimalism. He's a man of little words, so I'll see what kind of reaction I get during tonight's dinner.


If you'd like to cut this card by hand, I'm selling a "printable" and "cuttable" file on Craftsy.


May 8, 2013

Happy Mother's Day Card (die cut tea cup)


My mom has kept and treasured the handmade cards I crafted for her as a child. There's no better #1 fan than the person who has reassured my fears and advised me to do what made me happy.

I tend to be very structured in my designs, even though I have always admired more free flowing pieces. So I'm trying to push beyond my comfort zones and this is my first experiment.


I sketched my ideas, imagining how the layers of colors will come together. Stardream and Daiso paper is wonderful to cut even with a dullish blade and somewhat fine lines, because there aren't any residual fibers of paper sticking out in tight corners.


It's amazing how an idea can end up being so much more labor intensive than I imagined. The finer lines makes a smaller area for gluing, so the flowers simply take more time to secure. The graphic designer in me wants to simply print the color, even though I enjoy the look of layered paper. However, I can't dispute how well it looks overall when it matches the teacup perfectly.


I'm still working out the kinks on my 3D teacup, but I like how it comes off the page. I wanted to make the "tea" shiny and wet looking so thought of using some glitter nail polish.

Apr 27, 2013

3D Coffee Cake Birthday Card


This was a par-boiled idea, but I was making espresso the other day and realized the grounds are quite fine, so of course I thought of flocking. I have a birthday for a guy coming up and he loves coffee (it's not as easy for me to make cards for guys for some reason). I thought of making a coffee cake and covering my cake with grounds, then topping it with real whole coffee beans.


I tried using double sided tape, but the grounds (unused) wouldn't stay on. The glue holds an amazingly thick layer of grounds when I did a test. So I put down light blue vinyl on the cake where I didn't want coffee. Unfortunately the glue stayed on the vinyl too. So I had to apply the glue carefully before dousing with grounds. It's a good thing I used brown paper so any bare patches blend in.

Now that it's done, it makes me think of a chocolate mocha cake – plus it's like scratch and sniff sticker, except no scratching is needed!


Apr 24, 2013

Wedding Cake Card by Kelly


I'm not a bling personality, but I have to say this wedding cake card by Kelly, (findingtimetocreate.blogspot.ca) got my attention. It says everything a bride wants their special day to say, an event to remember for all time.

Although the background is neutral and allows the flowers to take center stage, the glitter makes a splashy show all on its own.


Kelly explains in great detail how she made this 3D cake card with glitter and what materials she had to change up to make it work. I love how she explains things so thoroughly, like all her posts on her blog.

Thanks, Kelly, for generously allowing me to show your card on my blog!

Cecelia

Apr 18, 2013

DIY Flocking

DIY Paper Flower Flocking


I've been seeing flocking all over the stores (and some ingeniously decorated nails). It's kind of like colored, fluffy, cotton candy, but in teeny pieces. I didn't want to buy more things, so my first thought was can I make my own? Yes I can!

I borrowed the microfine shredder from the kitchen, wadded up some paper scraps from Daiso, and shredded away. In case I didn't cover everything, I used the same color yellow as a backing, covered it in glue and dipped into my paper flocking (tweezers are helpful!). Then I glued it to my daisy flower, which then decorated my 3D cakes.


Apr 17, 2013

3D Cake - Daisy Birthday Card


Ever get those birthday cakes topped with plastic signage? I kind of wanted to replicate that for this birthday girl's card. I stacked the words 4 times out of card stock to make my own chipboard, just like I did for the LOVE sculpture. This time I made the top layer out of a lighter green so when it's viewed from the side, it gives another dimension - just a little something different. I stuck foam squares near the top so they stick up, then glued the bottom part behind the daisies.


Her fave color is yellow and since my original cake was too short to let me go nuts on the decorating,  I made it twice as tall. I always place my elements on my card to assess the spacing before gluing permanently. Although I thought everything was well placed, it ended up being lower than I intended when I stood back. So I added the fireworks I used on my Mickey Mouse project to fill the top. I feel like I overdid that too, but ah well, I'll live.

PS, here's a teaser image for my next post, where I'll explain how I made the stamens in the middle - yes, it's paper!


Apr 11, 2013

Shaping Die Punch Flowers


Before buying my Silhouette SD digital die cutter, I bought die punches like these. I toyed with giving them away, but now I'm really happy I didn't.


I shudder to waste paper scraps and want to use every inch of it before tossing it out (see my post on How to Use up Scrap paper). Using these die punches was easier and faster than trying to register the exact placement needed on my Silhouette. However, I still used the Silhouette to cut my cherry blossoms (middle punch) because I wanted the cup the petals more readily.


Top left: If using a cherry blossom die punch, snip in between the petals to make them easier for cupping.

Top right: This blossom is cut from my die cutter - see the deeper gaps between petals? I used a burnisher and rubbed the petals against a mouse pad. For those who have a digital die cutter, here is the cherry blossom I made in SVG, DXF and PDF format.

Bottom left: Continue rubbing into the center to make a small bud.

Bottom right: If you want the blossom to stay open, flip it over and poke a smaller burnisher into the middle, then add dots with a felt marker to represent the stamens.

I then used them to decorate this 3D cake card.