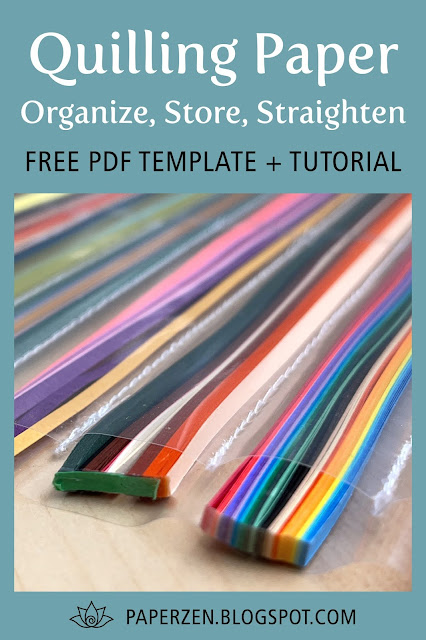
Let's organize your pre-cut quilling paper strips, so you can find any color or width quickly. Storage of conventional quilling paper can be done easily, while keeping it straight and tidy.
My History of Past Quilling Storage Ideas
2006: Shoe Box
My first quilling paper came from the book, Twirled Paper, by Klutz. I still recommend this book to any beginner quiller, because it comes with everything you need to get started: a slotted tool, paper, glue, googly eyes, and fun patterns. I used a shoe box for storage but I’d accidentally crimp the paper. When I bought more paper and of course, it got messy.
2010: Push Pins on Foam Core
I decided to pin my paper to some foam core to straighten my paper. I loved how I could find any color, and have immediate access. Then we moved and I had a smaller space, so I couldn’t lie my board flat. I realized when I had to store the board vertically, the weight of gravity would make the paper split apart. (read more here)
2014: Foam Core Box
We moved again and I had more space, so I made a custom foam core box with dividing channels and notches to access trays below. It was meant to be like the cork board method without the pins. The foam core was the perfect height for protection against accidental crimping.
I liked how I could set the box on the open drawer, and make it behave like a table, and it didn’t need space on my desk, but it was a hassle to access the trays below.
In the end, my foam core organizer looks nice and works in theory, but in reality, as I reach for a strip, it would jump out of the channel, so I wrapped paper bands around them to keep them tame. Then I even used removable tape across the channels keep them fenced it. It worked ok, but I didn’t love it. (read more here)
This is also when I started using a binder for the left over strips (read more here). I love how I can find the exact left over strip. I really didn’t like it when I reached for a new strip, only to find out I already had a half used one ready to go. I could combine the similar colors together. The binder is very condensed and great for travel too, especially if you’re just travelling to your kitchen table or couch.
2020: Quilling Strip Sheet Organizer
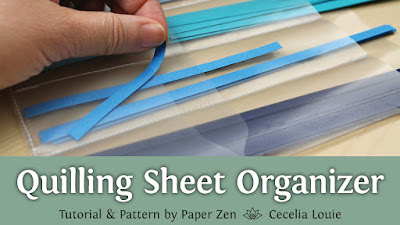
In a previous video, I showed how I organize my 11” quilling strips with a plastic sleeve. I love how I can put them in a binder, or in a container on my desk to reach for any color. Best of all, I can store the leftover strips in the same area. This really suits the thicker paper I like using for quilling letters, which is Canson Mi-Teintes. (read more here)
2020: Quilling Paper Strips: Organize, Store, & Straighten Pre-cut Conventional Supplies
Since the plastic sheet organizers were so perfect for storing my short strips, I was happy to find a large format or 11x17 inches sheet as well.
The conventional quilling paper I have my craft room are between 18 to 24” long, depending on the brand. I needed to extend the plastic sleeve a bit, to make sure the ends don’t flop around, so I cut another plastic sheet into thirds and added it on the right.
The plastic sheets are very thin, so it takes up less space in the drawer. I can stack several layers on top of each other in my drawer, and reach for a specific sheet, even if it’s on the bottom.
I’ve divided most sheets into 12 rows. I grouped colors in warm, cool, multi color, and wider/thicker strips. The wider/thicker strips obviously needed more room, so there are less rows on this sheet.
The clear plastic lets me find any color and check the width by turning the strips.
I plan to use Washi tape to remember the brand name and color.
As I slide the papers in, the rows help tame the strips with a few taps. Its easiest to slide the paper in from the left, because the top piece of plastic is shorter than the plastic on the bottom.
To detach a strip, pull the paper out slightly on the left, and detach on this side. Then detach the other side and slide the single strip out. The rest stays put.
Concerns
To figure out the row width, all I did was slide some paper in, and pinched the plastic to see how much friction was there, when I slid it back and forth. As you use up your paper, it won’t have as much friction because there’s more room. When this happens, the paper can skew diagonally. Other than the paper being a loose fit within the row, it doesn’t seem too bad. A loose fit in the row could result in it sliding out of the plastic sheet due to its own weight. So I do need to remember to keep the sheet level as I handle it.
You can put smaller quantities together to bulk it back up. Here I’ve put several single strips together, and as I pull on one strip, the rest seems to stay in place. I haven’t been using it long enough really to know if this is a nuisance, but so far it seems ok.
If you want a color in the middle of a multi color pack, I do find it need to pull the paper out more so I can get access to the color I need.
I would say it’s easier to detach paper from a pack that’s all the same color vs one that’s is a multicolour pack - but when you can’t decide on a single color, what are you gonna do?
Since the pros greatly outweighs the cons, so far I’m pretty happy with this method compared to my previous organizers.
Please let me know what you think of this idea in the comments below. Giving me your feedback let’s me know if these tutorials are helpful, and it just keeps me motivated.
If you have a quilling storage hack, please share it in the comments below so we can all learn from you too!
Quilling Paper Strips: Organize, Store, & Straighten
How to Make Tutorial
- Download free PDF template
- Large format plastic sheet protectors (I bought a version from Canada)
- Scoring tool (example: dried up pen)
- 24" ruler
- Scotch Removable Tape or MT Washi Tape
- Scissors
- Craft knife
- Sewing machine
Steps
- Trim the right end off a plastic sheet to create a tube.
- If your paper is long like mine, you may prefer to extend the length. Cut another sheet into thirds. This will extend your sheet by about 5.5 inches wide.
- Since the first sheet and the extension are the same size, we need to tuck them into one another, to force it to overlap. Snip diagonal corners off the first protector on the left, about 1/4” in a 45° angle.
- Tuck the snipped edge into the extension and tape in place on both sides. It’s important to tuck the left side inside, not outside. If you tuck it outside, as you slide your paper into the row, it can snag against this edge.
- After you download my template, you’ll see I have two for you to choose from. Page 1 is divided into 12 rows x 1” high. Page 2, is divided into 12 rows unequally to give you a mix between larger multi-colour packs and smaller single color packs. Cut your chosen template vertically in half.
- Insert the template halves on either side of the sheet protector.
- Use a ruler and scoring tool to trace along the template, leaving an indentation in the plastic.
- Remove the template and sew along the score lines. Now you’re ready to tidy up your supplies!
Do you have a favorite way of storing your quilling strips? Please share your ideas with the rest of the quilling community in the comments below!


Can you update it with step by step pictures please?
ReplyDeleteHi, as a newbie quilled I'd like to say thank you for your fab tutorials bothhere on your blog and also on YouTube.
ReplyDeleteI do have a question though, here in the UK it is impossible to get hold of the side opening landscape sheet protectors. Is there a reason that portrait ones cannot be used, turned on their side? I know this means the punched holes will be along the top rather than down the side but I cant see that being a problem. Would this still work?
Thanks, keep up the great work.
Hello Lynne, welcome to quilling! I'm so happy to hear my tutorials are helpful to you. Yes, absolutely you can use sheets turned sideways. I just used the larger protector because it fits inside my drawers so efficiently. If I used two 8.5x11 sheet protectors, I'm sure it would work too, but for my drawers, I wouldn't be using the full depth. Hope that makes sense. Happy quilling!
DeleteCecelia