Showing posts with label pattern. Show all posts

Mar 31, 2020

3 Ways to Cut Quilling Strips by Hand - Free Pattern and Tutorial

cut quilling strips by hand - free pattern and template

3 Ways to Cut Quilling Strips by Hand

In my latest free tutorial, I’ll be showing you step-by-step, a couple of methods of how to cut your quilling strips by hand. Download my free printable PDF template. There’s also bonus that I’m sure any quiller will enjoy!


I've made the following widths for DIY Quilling Strips:

Inches: 1/16, 1/8, 1/4, 3/8, 1/2

Millimetre: 1, 2, 3, 5, 10


Quilling Paper Strips - Cut by Hand


Materials:

sharp craft knife (Method 1 + 2)
metal ruler (Method 1 + 2)
cutting mat (Method 1 + 2)
rotary cutter (Method 3)

Method 1 - Cut Quilling Strips with Margins

Print the template directly onto your paper. Cut from the printed line at the top to the bottom, leaving margins. These margins help keep your paper extremely tidy. 


Method 2 - Cutting without margins

If you don’t want to waste any scrap of paper, you can cut edge to edge. Print the template on regular paper and cut off both “rulers”. Tape these rulers to your cutting mat, leaving enough space for the full length of your paper in between. Cut edge to edge, with no wastage.
You would never want to print the markings onto your paper, and then cut all the way, because the markings would show on your quilling strips, and that just won’t do!


Method 3 - Rotary Cutter

Watch the video to see how to find your exact cutting edge. You'll also see how to make a jig for cutting the same strip width without needing to look at your markings at all. Discover how to make a fringe so you can trim off the excess markings.


Bonus

Type a message onto your quilling strip, then cut it out. Wrap a gift or start quilling with your customized ribbon. It’s like a message in a bottle!

Do you have any you’d like to share with everyone else? If so, I’d love to hear about it – please leave a comment below.


Sep 25, 2019

Halloween Owl Treat Box - DIY Edit & Print PDF Pattern

halloween owl treat box printable PDF


Make a Quick and Easy Halloween Owl Treat Box with my Printable PDF Pattern


I've re-visited my fun Halloween Owl Treat Box, so you'll see how to make quick and easy they are to make with my new assembly video.

Jul 18, 2014

Quilled Champagne Congratulations, A New Tutorial Pattern!


My friends got engaged and I wanted to quill them something to commemorate the happy occasion. Champagne glasses immediately came to mind and then I wondered what to put around the clinking glasses — confetti and streamers of course!


I think of pink for a rosy congratulations, whether for a graduation or even an invite to "eat, drink, and be merry". The example shown here has the pink dots ready-to-print along with the frame.


For a classic golden hue, great for an anniversary or to give to your spouse, you can choose to hole punch your own paper out of 1/8" (shown here) or 1/16" hole punch.


As you can see, there are two frame options available, and both come with and without pink bubbles, so you can choose whatever you like. Both have a ribbon along to bottom so you can type whatever message you like. After scoring and trimming, your finished card will be 4.5x6.25 inches when folded.


Of course, it's not complete until you've assembled a customized envelope in matching font as well.

As with all my quilling tutorial patterns, you won't need a ruler to measure the strips needed. Simply lay your strip on top and score/fold along the indicated lines. Then follow the illustrations and photos to see how they are easily assembled.


If you'd prefer a different size of card or don't want the frames, it's easy to make a few more pieces of confetti to throw around it. I like gluing my confetti at different angles so it really looks like it's fluttering around.


This latest quilling pattern is available in my Etsy shop (10% coupon code is in the caption below). I hope you have a wonderful weekend full of paper scraps on the floor.


I can finally buy my quilling supplies locally, at Precious Memories! They sold out of my book at my first ever quilling demo the other night. My nervousness was completed dispelled by the enthusiastic attendees.

I'd like to celebrate (pun intended) my achievement with a 10% coupon for my Etsy shop. Just enter CONGRATS10 (expires July 31) during your checkout.


Craft Ideas is hosting a giveaway of my book! 3 lucky winners will receive a copy if they enter before 9/30/2014.

Mar 24, 2014

Quilling Cupcakes - PDF Pattern / Tutorial


Who can resist a cupcake? Guilt-free and fun to make, these luscious swirls will make a card to keep.


There is an unusual way the creamy icing is made. It's not simply rubbing the strips in strategic places - I think that would be a bit of work and I'm quite lazy! There is some prep work involved in the set up, and then after that, it's frosting all the way. 


My file contains templates to print the 4.5" x 6.25" card backgrounds and also allows for you to type your own message as you see here.

My file contains four ready-to-print 4.5" x 6.25" cards and also allows for you to type your own message. To top it all off, there is also an editable envelope as well. This fresh batch of goodies are available now in my Etsy shop.

Mar 28, 2012

Quilling Flower Pattern Update


3 years ago I offered my open style quilling flower patterns on Etsy. I’ve wanted to update this tutorial for quite some time and have finally been able to finish this project. What’s new? Double petals, stamens, larger and smaller flowers, 8 petal flowers, and a super easy-peasy guide for measuring each strip. For those who dislike reading manuals, there are more step-by-step photos to show each stage. The new quilling tutorial/pattern will still be $5. All 2012 purchasers will receive the new pattern free. Clients up to Dec 31, 2011 will be emailed a coupon code for a 50% discount.

I’ve had such positive response over my previous “heart full o flowers” that I chose to do it again, but bigger to show off all the flower types. I used 2 strips of 11″ Bazzil scrapbook paper because it’s thick – I prefer to have a stronger “fence” as I filled in the elements. Here are some stages as I went along. I started at the bottom and just nestled some next to one another, seeing what fit in terms of size, color, and style. Loose scrolls would be added after to fill in some blank areas too small for flowers. The final size is about 5″ x 6″.


My previous PDF pattern included 5 card designs to be used as backgrounds and 1 envelope. I’ve decided to offer these printables for free on my blog. Download here. Your feedback keeps me going – thank you!


Aug 30, 2011

Quilled Butterfly Keepsake Box / Card / Gift Tag

Found this keepsake box at Daiso for $2. It's covered with a diamond patterned paper. 


The embossing is subtle enough to accept quilling pieces easily.

Strathmore blank cards are my favorite type to glue finished quilled pieces on because I like the contrast of having a textured paper as my background. The deckled edge also gives it a handmade quality versus having the typical straight cut.

 The free background on this gift tag came from Shabby Princess, Spring Breeze theme. The font is called Fling. After hole punching the tag, I threaded the two ends of a tied bow through, which allows the bow to sit front and center and the ends are free to be tied any which way behind.

A huge thank you to Nancy Babb for helping me edit my latest butterfly quilling tutorial PDF. Having her insight made the "how to" instructions easier to follow. 

I thank everyone for their input and helping me improve. Your comments on this blog encourage me to keep doing what I love.

Mar 21, 2011

Silhouette Pen Comparison

Found a pack of 12 Mini Gel Pens from Staples for $4 and hoped it would fit my pen holder from Silhouette. I was disappointed to see the pen won't go into the holder all the way. The Pentel Metallic Gel Roller fits though!


I took Staples and Silhouette pens apart and realized the Staples pen length was longer, but other than that it was about the same as Silhouette's pens. So I stuck the cap on top and taped the whole thing to prevent it from moving. After my Silhouette pens run out, perhaps I'll just cut down the Staples length and that will be my instant refill.

Here are the comparisons of all 3. Just click on the thumbnails to see a good enlargement of the details.

Feb 15, 2011

Transformer Birthday Card (Vinyl)

My most complicated die cut vinyl card to date – 5 colors and tiny details that added up to a card I hope my 11 yr old neffy-poo will remember. I got the vector file at Vector Junky but some of the details were so fine I had to open up the areas, as it kept getting caught in my blade.

Jan 26, 2011

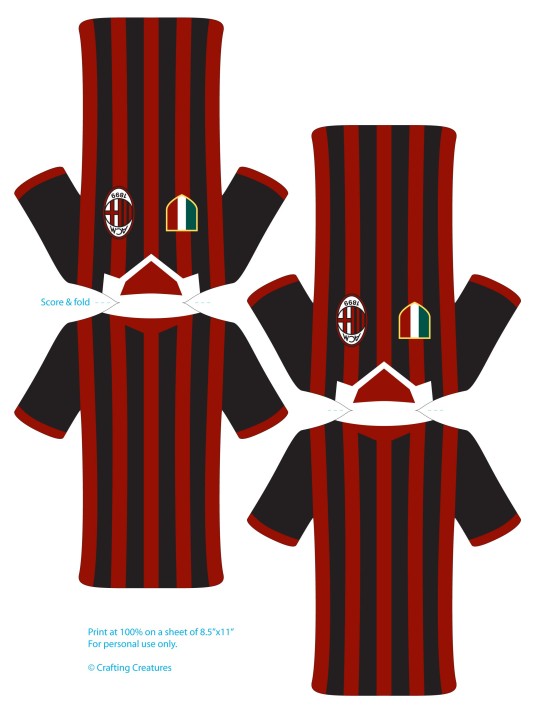
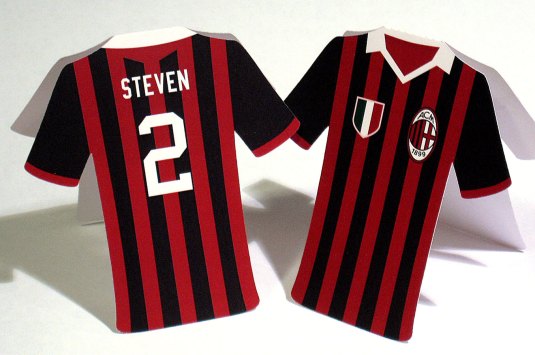
DIY Soccer Jersey Placecard


Since blogging about the soccer themed place cards made for my nephew’s baptism, I’ve been asked about them numerous times. I used an electronic die cutter (Silhouette) to cut them out, but there’s no reason why it can’t be done by hand.

I’ve made a PDF with fillable name and number to print out. You can cut them by hand or use the SVG files on your electronic cutter (Cricut or Silhouette with Designer software).

Please credit my blog and I’d love it if you could comment with a link to your blog or a photo of how your project looks. Your enthusiasm keeps me inspired!


Jan 12, 2011

Die Cut Jersey Place Cards


These place cards were cut in the shape of soccer jerseys, with each name and table number showing the guests their seating.

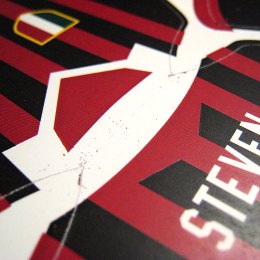
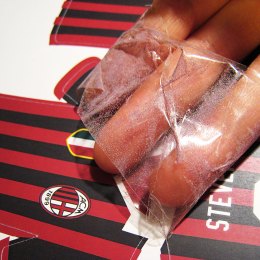
A hazard of printing all the way to the cutting edge on coated card stock is powdered toner flaking off. A nice way to pick up all the toner is to wrap packaging tape around your hand with the sticky side out. Gently skim the surface of your paper, picking up the toner before it has a chance to coat the adhesive mat of your die cutter, thereby ruining future adhesion. Note to self: leave a white margin next time!

If you’d like to cut these jerseys, here are links for a fillable PDF (yes, it'll look just like the font you see here), SVG, and DXF file.

Jan 11, 2011

Ice Salt Shaker

Winter has come to Vancouver and instead of reaching into the plastic bag of salt (which is always in a threatening state of spilling because we’re too lazy to re-tie), I decided to poke holes in the lid of a a plastic container (held nuts) to make myself a large scale salt shaker. I was given an industrial strength hole puncher used in shipyards – it cut through the 1/8″ plastic lid like butter. Of course, I just had to customize it with my die cutter. Note: don’t leave it outside, as salt can solidify into a single block.


Oct 18, 2010

Birthday Cards in Vinyl

Saving these scraps of vinyl from the landfill gives me a total thrill because something so nice can be made from nothingness – kind of like a MacGyverism. Still learning which fine lines don’t cut well on vinyl. I was shocked brushed metal (kind of like heavy duty aluminum foil sticker material) is offered in vinyl and couldn’t wait to use it on the blue card – it just made it!
I used Adobe Illustrator to layout the elements, and Sillhouette/Craft Robo to cut vinyl, then manually aligned as straight as possible. The vector illustrations are free and found via these links: Lovely Flowers / Happy Space Pack

Oct 4, 2010

Die Cut Dragonflies

I envisioned a dragonfly cut from translucent paper to allow light to pass through the wings. The wings are supported by a base to give it varying heights. The body is glued on top and the tail is slight curved, which hubby assures me is more realistic (he knows from catching enough of them). I wonder if it would make a nice mobile or wall art – fragile though.