Showing posts with label DIY. Show all posts
Showing posts with label DIY. Show all posts
Jul 23, 2014
DIY Electric Quilling Tool
Before anyone goes out to buy this, I'd like to say that I won't be using this to quill! It spins so fast, I can't keep the strip edge even. However, I'll explain my "just because" experiment.
Apr 13, 2014
DIY Mason Bee Hive of Paper
Our wonderful neighbors have the busiest pets - mason bees! They only live 2 months but help pollinate our plants during a crucial time. Our blueberry bushes were the fullest they've ever been last year and our neighbors are generously sharing their extra cocoons with us.
Although they also gave us a pre-made house, there are so many extra cocoons that I wanted to build a second house - out of paper of course. It's easy enough to buy paper straws, but where's the fun in that?
When the bees hatch, they remember the color of their "door" - in this case green, to match the tissue box. I made a removable velcro door "lock to keep the door from moving around, yet allow the paper tubes to come out. I will be placing the cocoons inside the hollow door cavity. Here you can see the opposite side of the velcro and the other door stopper along the top.
Remove the door stoppers and out comes the paper tubes. Mason bees don't sting (unless squeezed or stepped on) and they don't make honey - just more bees. They lay eggs in the tube, place pollen next to the egg, then mud up a wall to divide the space for the next egg. In the fall when the cocoons have hardened, it's a good time for us to clean out the tubes, remove the mud, get rid of spider mites and store in the fridge to keep them safe from predators like wasps.
I've heard with store-bought paper tubes you would soak them in water to slowly unravel. To make it easier on myself, I only glued a tiny bit near the back end to make insertion into my hive easier - should be easy to slit open with a craft knife. I cut sheets of 8.5x11 paper in half to get 8.5x5.5 sheets. Then I cut them down into thirds to approximately 2.75 x 5.5 inches (so 6 pieces in total per sheet). I rolled them around a crochet hook, glued just the very end, and inserted into the holders.
I made two tube holders with 8.5mm holes. The front holder has holes on both sides, allowing the tube to pass through. The back holder is solid on the back wall, keeping the tubes even. I plan to color code the front wall to make it easier for them to find their tube - apparently they get confused if it all looks the same.
I have no idea if this will work - check back with me in the fall. There are many tutorials on-line showing so many materials used. One could buy the paper tubes and encircle with a rubber band and achieve the same result. I guess I could have made it full of tubes and no holders, but it was just fun to make the holders with my Silhouette SD die cutter.
Have you ever made a paper mason bee hive?
Dec 22, 2013
DIY Tape Storage
This is my DIY tape storage method. It holds two diameters of varying adhesive tape and both can easily be lifted out of the drawer.
The smaller roll lifts right out of the larger roll, which otherwise would be wasted space.
Here's how I made it:
1) Cut two pieces of foam core, 3.5" square and 2.5" diameter circle, for sturdy bases.
2) Trim chipboard card stock to fit your drawer depth. I trimmed mine from 8.5" to 7" width which then fit vertically in my 7.5" deep drawers.
3) Roll the card stock into a tube and release within a couple of the tape rolls (which gives you the perfect size). Glue/tape the edge to prevent further unraveling. Remove the rolls from the tube.
4) Coat the bottom edge with white glue and adhere to the foam core, pressing firmly. After it's dry, slip the rolls back on the tube and you're ready to get sticky with it.
If you happen to make this, I'd love to see your version!
Cecelia
Sep 25, 2013
Printable Halloween Skeleton Coffin Party Favor Box
Two years ago I designed a coffin that folded together without glue (an
homage to origami). I wanted it to be strong and am proud of how the
friction fit lid will stay snug even when full of candy. However, the intricate design benefited from a digital die cutting machine's precision because I gave allowance for thick card stock.
Since then I've had requests for a hand cuttable version and I'm finally happy with this version. I really wanted to make a hinged lid so you'll only need to print 1 sheet per box. The coffin bottom has 3 sides with doubled over paper for rigidity. The lid has 2 tabs that lock into the bottom to prevent horrifying spillage.
It's fun to print it on different color stock and in this case I roughed up the toner to make it look worn and old on kraft card stock, but it also looks great on metallic silver.
This pattern is now available in my Etsy store. Wishing you a boo-tyful night!
Sep 22, 2013
Halloween Ghost - Party Favor Treat Gift Box
My favorite party favor of all time is this shape because it's quick & easy to make, has an unusual surface area for design, and holds a surprising amount of treats.
4 ghosts fill up a sheet of 8.5x11 inch paper efficiently, so there's very little waste. Remember to print "Fit to Page" so it maximizes the printing area.
Watch my updated video tutorial or read the assembly instructions below.
1) You will need also need scissors, 1/8" hole punch, double-sided tape, and about 6 inches of 1/8" width ribbon.
2) Flip over the ghost. Place double-sided tape along the left edge and along the top right as shown by the arrows. Remove a small portion of the wax along the left and fold it down (do not remove all the wax yet).
3) Keeping your fingers on the waxed portion, roll the ghost into a tube, overlapping the gray diagonal lines. When it's aligned and straight, press the exposed adhesive. Gently pull more wax off, then press to adhere. Repeat until you have a completed tube.
4) Remove all the wax from the end of the tube.
5) Guided by the small gray line, pinch the top end closed.
6) Guided by the two small gray lines at the bottom end, pinch closed, then fold the end over toward the back. Unfold and fill with treats.
7) Punch a hole in the bottom middle. Fold your ribbon in half and thread it through partway. Take the ribbon ends and thread it through the folded ribbon, then pull until taut.
8) You're ready for a boo-tyful night of tricks and treats!
If you'd like to make your own for a wedding or other occasion, I have a template and examples in a previous DIY post: http://paperzen.blogspot.ca/2011/01/diy-party-favor.html
If you enjoyed making this pattern and would like to make more, I have 4 more patterns (witch, mummy, candy corn, and frankenstein) in my shop.
Apr 18, 2013
DIY Flocking
I've been seeing flocking all over the stores (and some ingeniously decorated nails). It's kind of like colored, fluffy, cotton candy, but in teeny pieces. I didn't want to buy more things, so my first thought was can I make my own? Yes I can!
I borrowed the microfine shredder from the kitchen, wadded up some paper scraps from Daiso, and shredded away. In case I didn't cover everything, I used the same color yellow as a backing, covered it in glue and dipped into my paper flocking (tweezers are helpful!). Then I glued it to my daisy flower, which then decorated my 3D cakes.
Apr 7, 2013
DIY Re-usable Gift Box using Vinyl and Free Flowers
"Just buy a dollar store bag and save yourself time", hubby said. But what's the fun in that? OK, so I was kind of rushed, but it's a different kind of rush right?
I salvaged a stationery box from work that fit my gifts perfectly, but of course it's ugly. I amassed the largest pieces of scrap vinyl (salvaged from a sign store) that would go together.
I made sure the vinyl would cover the box with some excess on all sides, removed the wax, and placed the box right in the middle, using a bone folder to squish out the bubbles from the middle to the outside edges. Then I cut 45˚ slits toward the corners.
I brought the long flaps up, stuck it against the box and trimmed off the excess triangles, leaving a tab to fold over to the other side. This ensures you'll never see the old box.
Then I adhered the short sides and trimmed off the excess all around.
My family and friends know I try to be as eco-minded as possible. I've had to ask for my xmas gift bags back and cushion their crestfallen faces by reassuring them another gift will come in the same bag next year. I don't tend to do that with birthday gifts, so when my sis-in-law saw this box, the first thing she said was "Can I keeeep it?" and hugged it to her chest. I can't tell you how happy that made me!
I've used this free flowers file for other projects in the past like cards and flower pots:
http://www.fordesigner.com/maps//10878-0.htm
Nov 21, 2012
Paper Poinsettia and Wreath
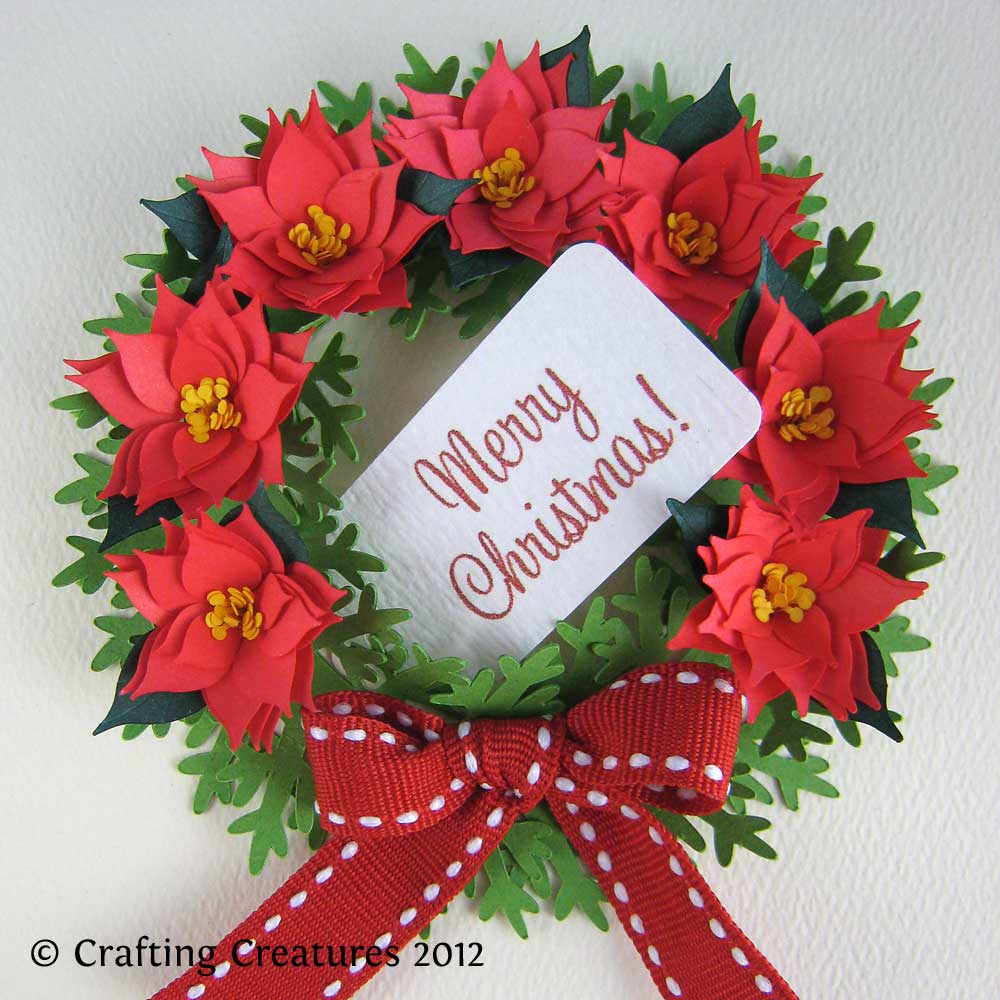
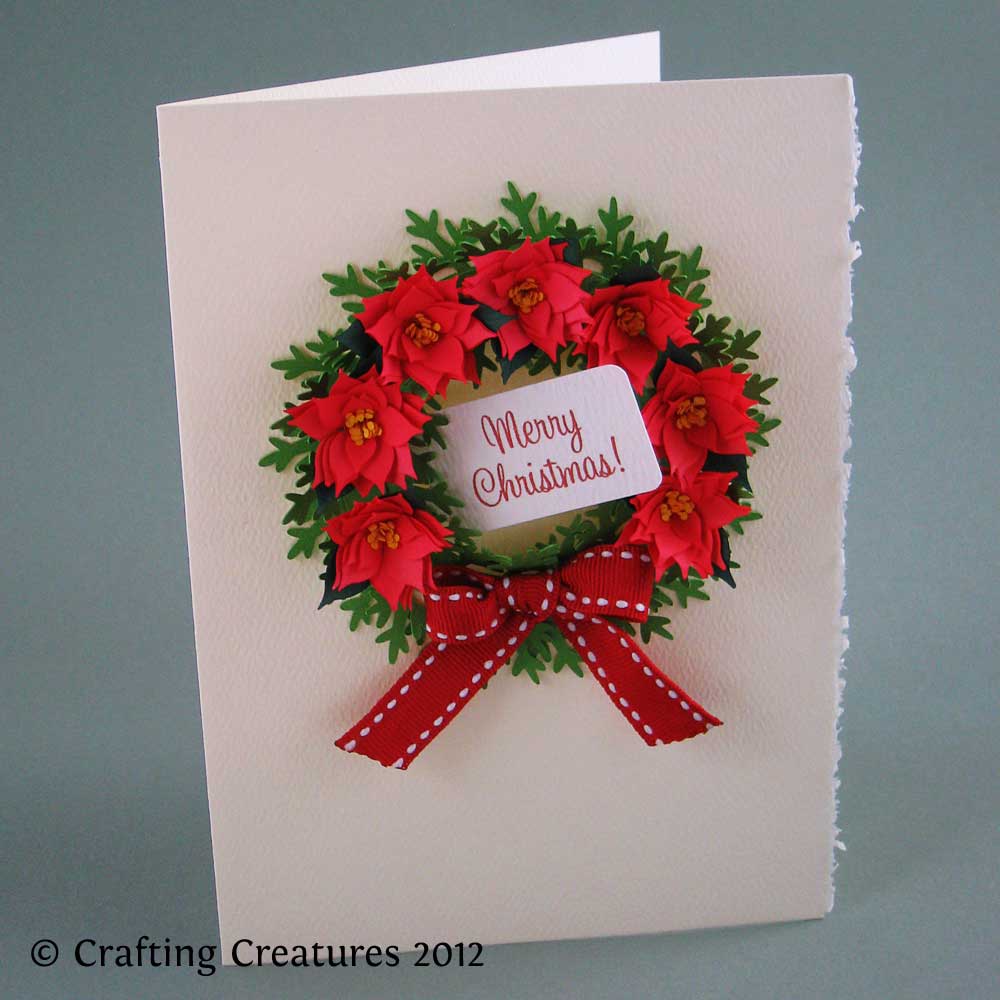
The pine needle wreath is cut from two pieces of 80 lb paper and overlapped, then fluffed into shape to give the poinsettias a festive base. This example is a 5" x 7" card.
Maybe I was a squirrel in a previous life, but as a little girl I loved boxes to hold things, keep secrets in them, and to give gifts in. This cube has a prepared hole for an enlarged version of the poinsettia. The cube is 2.5" x 2.5" x 2.5".
I don't bake a lot of cupcakes so this is about as close as I'd come to cupcake toppers. I have loved ones who are allergic to nuts and some who can't handle spicy foods. Instead of a quilling tool, I rolled the poinsettia in a toothpick, then glued in place. Added the warning flag at the bottom, and voila - food markers.
Labels:
card,
christmas,
die cut,
DIY,
fringed,
paper,
party favor,
poinsettia,
wreath
Feb 22, 2012
DIY Tracing Light Table
I needed to trace something and instead of taping it against the window, I realized our acrylic cook book stand was simply perfect. I lay it down on it's side and placed my lamp along the "bottom". Who can resist a 2 for 1 deal?
Jan 20, 2012
Heart Inspired Bunting
This is my first die cut paper banner / bunting / pennant design. A much anticipated little girl is expected this Valentine’s Day, and I wanted the shape of her shower’s banner to be reminiscent of a heart but not be quite that obvious. I also tried to keep some dynamic movement by having the overlapping shapes show thick and thin areas – not just a straight outline.
I’ve always felt ribbon is akin to a backup singer – to support the lead and not steal the show. To give all the emphasis on the lettering, I ensured the ribbon is easily threaded through loops on the back layer so one doesn’t see the supporting holes.
The three shapes (pink, green, white) are cut from 8.5″x11″ paper. The three layers are aligned using a jig so no eyeballing is needed. The lettering (not included) is Adobe Caslon at 410 pt. I can’t remember the brand name of ribbon, but it’s a sheer lime green and I got it from Michael’s.
Part 5 (and final installation) of my Valentine Collection on Etsy.
Jan 14, 2012
3D Paper Ball with Hearts and Arrows
Beware of Cupid’s shooting arrows! It was a great discovery my first time to use an ink pad on the edges of my paper ball decorations to add dimension. I realized dragging the ink pad across the arrow would make it appear as if Cupid had just let it fly, especially when it caught on the edges.
Part 4 of upcoming Valentine collection on Etsy.
Jan 5, 2012
DIY Custom Chipboard Letters
I've heard of scrapbooks that rival the thickness of a New York hoagie. Perhaps it's because sandwiched in all the layers are dimensional chipboard letters lovingly decorated for each page; but what if you want your font, or your size, or your whatever?


I made this chipboard version of the famous LOVE sculpture, designed by Robert Indiana. After cutting out the paper on my Silhouette, I glued 8 layers of 80lb cover weight card stock together (6 white pieces sandwiched in between 2 red ones). It makes an intriguingly subtle effect when glued on cream stock because the white seems to have life of its own. Pinning in strategic corners onto corrugated cardboard allows you to keep them in register as you race before the glue dries.
Oct 30, 2011
My New Craft Room
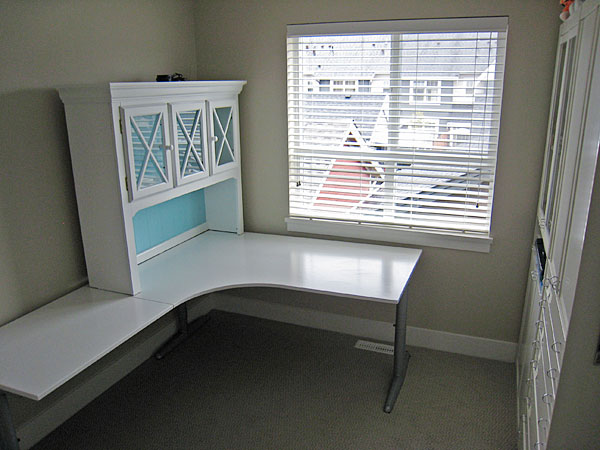
Here it is, all shiny and new - to me anyway. It's all messy with a laptop, die cutter, printer, and paper everywhere already, but at least I remembered to shoot it in it's pristine shape. Here are the nitty gritty photos so I can remind myself how much it took to get it here (and save poor hubby and me more work).
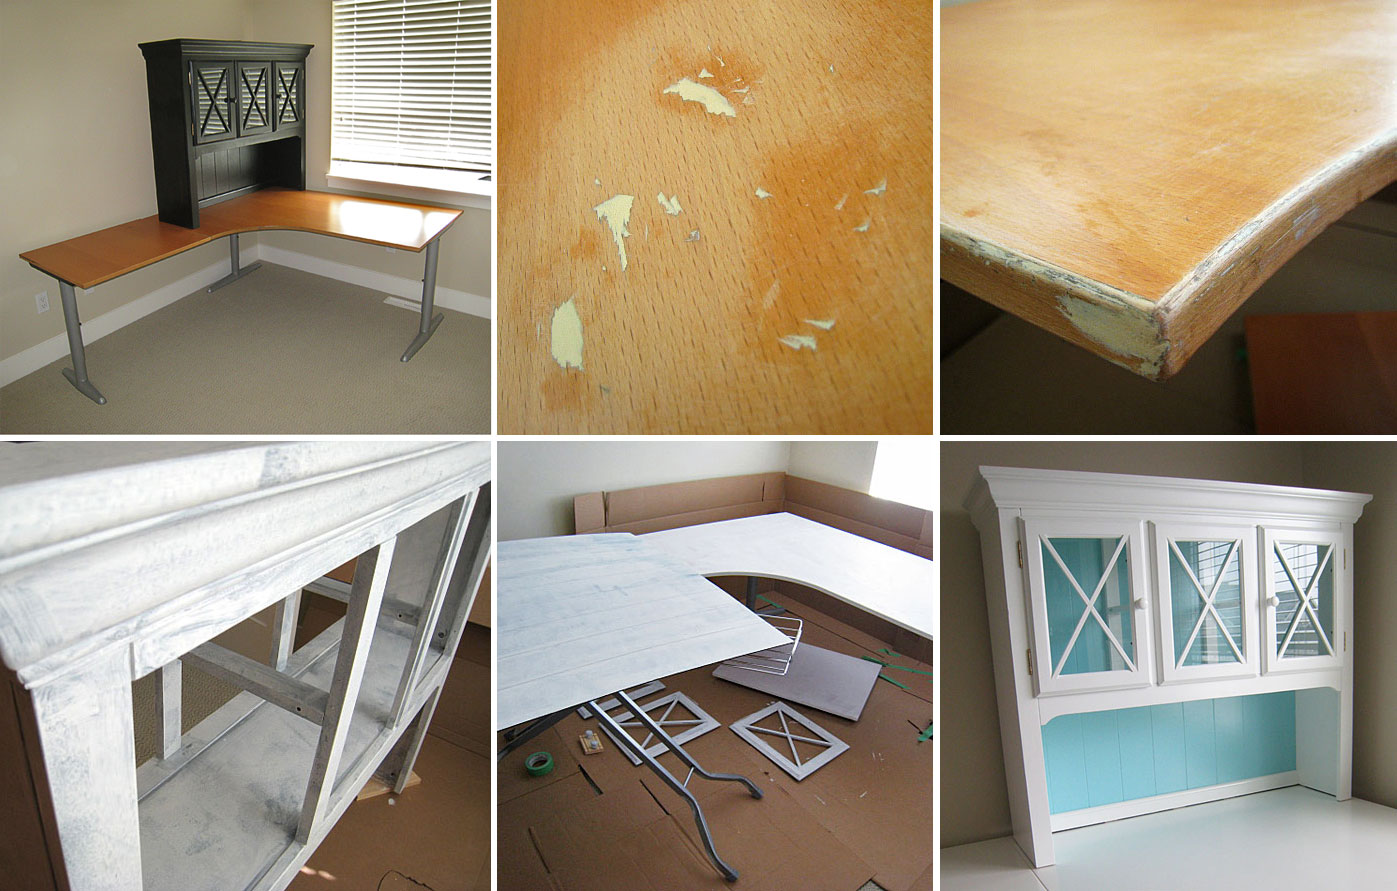
Amazingly, the never-unwrapped hutch was still available after a month sitting on Craigslist Free listings because it had no matching bottom. The L-shaped desk was quite pitted, but fixed easily with wood filler, then rough sanding prepared it for primer paint. An ironing board is great to hold furniture at eye level. Great thing about moving is all the extra cardboard lying around to be used as a drop cloth for paint. Oh Martha, your robin egg blue just screams "craft with me".
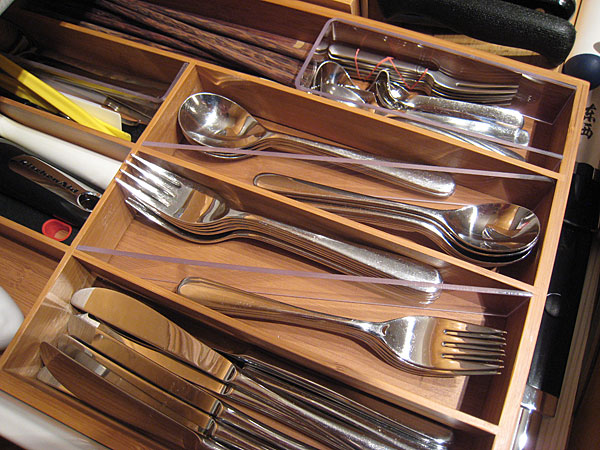
So what's up with the utensil tray? We were very lucky hubby's work had these offcuts of acrylic sheets at exactly the right height - kismet, I know! Our previous kitchen drawer allowed for a 2-tiered tray to divide the large and small spoons and forks, so we had to find a new solution for this tray. I love how the acrylic seamlessly divides and concisely uses space. The chopsticks and teaspoons are tamely corralled with a U-shaped bent piece. Yup, you guessed what I'll be using to divide all my supplies! More to come one day.
Oct 1, 2011
Die cut spider
Scary movies know thrills are intensified by allowing your imagination go wild before they reveal the ending. Here's my teaser - stay tuned for more. Happy 1st of October!
Subscribe to:
Posts (Atom)


