


You may have seen me use this fine-tip glue bottle before. It allows me to put down a thin line of glue on a piece of plastic. After the glue dries, I can easily flake it off and re-use the plastic again. I got mine at Michael's years ago, but haven't seen it around in a while. I've seen a similar bottle sold by Quilled Creations. I typically use Aleene's Acid-free Tacky Glue because it's thick and dries clear, quickly.

Then I simply "skinny dip" my end into the glue line and voila! It's very easy to control this way because the depth of my glue is extremely shallow. Just let the end kiss the glue. There is no need to jam it into the glue until you touch plastic.

This glue dries quickly, so here is a shot of the end when the glue is starting to thicken. The bead is wider. At this point, I am debating whether to use it or not. The glue seam will be more visible. So I would pinch off the glue with a tissue and re-dip with fresh glue.
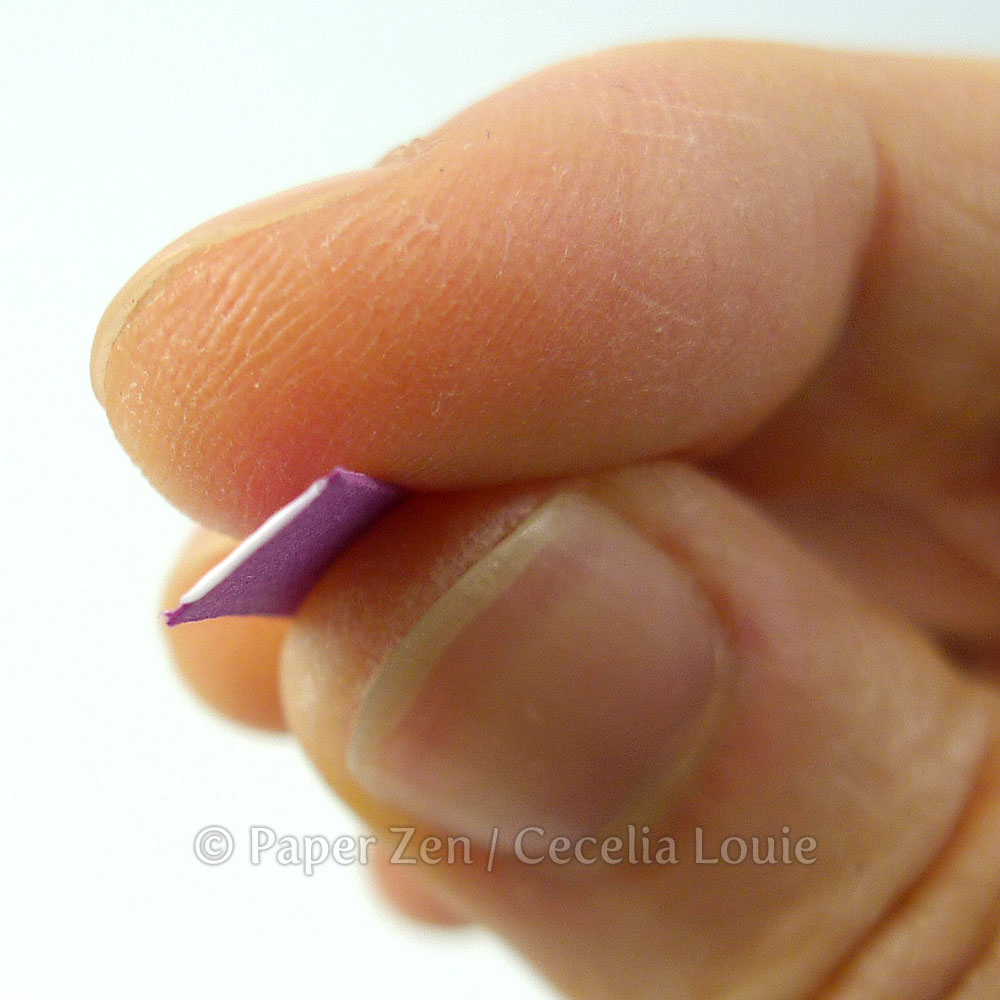
By the way, the paper shown here is Canson Mi-Tientes, #507 Violet, 160 gsm, 1/4" wide.
I am a listener of Monica Lee's podcast show "Smart Creative Women". Her guest, Jennifer Lewis, explains how she decided to paint for half an hour every day, and how it became a practice for her.
I am often asked "How long did that take?" Unfortunately, I have a difficult time answering that because I lose track of time so easily. Any quiller can tell you a large project is meticulously constructed over many days or weeks. I'm often tempted to buy an old fashioned sandglass! Does anyone have a good way of monitoring themselves?
So I thought I'd try to quill for half an hour every day and see how far I got. 10 minutes into it, I thought "I wonder if anyone wants to know about how I do this part?" 2 days later...prepping, photographing, color corrections, oops – not the right focus, re-photograph... I'm finally starting to post the first few steps of this typography project.

Here's a sneak peak of the next tutorial.
Some of the wonderful feedback I've gotten for my book, Pretty Quilled Cards, and for my Craftsy class, Quilled and Sculpted Cards (ALL classes are $19.99 and under until Nov 30 – best deal of the year!), shed light on the fact that I take my often detailed brain for granted. I know not everyone is as into the minutiae as I am, but those who are, these next few project posts are for you.
As always, I'm grateful for the time you take to leave you kind comments – I re-read them to keep inspired!
Cecelia

Cecelia,
ReplyDeleteThank you for sharing your tips, ideas and wonderful work with us.
Hello Monica, thank you SO much for taking the time to leave me a kind word of encouragement! :D
DeleteCecelia
I always wonder how you can put glue on the edges to make the item stand on edge and the glue not show....this was a help on how you apple to glue ends....thank you so much!
ReplyDeletePaper Hugs,
Jan
Hey Jan, thank YOU! I'm so pleased you left this message for me. Sometimes I wonder if there is a point to pointing things out – and then I read your message and know it was worth it :D
DeleteHappy quilling to you!
Cecelia
I have both of your books (the one you wrote and other featured) and just love your style----I'm still struggling to do things on the miniscule, and in such awe and gratitude of the time you took in taking pics, retaking, writing it up and putting it all together (prolly takes longer than the actual project!!) but it is GREATLY APPRECIATED
ReplyDeleteHello Amy, THANK YOU, THANK YOU, THANK YOU! :D You totally made my day and I'm grinning from ear to ear right now - thank you for your kind words. I love knowing when I've encouraged others to play with paper. Yes, it took much more time to explain these little things, but I think there are those who want to know what I'm learning as I go along. Happy quilling!
DeleteCecelia
The close-up photos are SO helpful! Thanks for taking the time to document your process and explain it step by step. I'm curious -- is this how you would glue down the entire fine edge of, for instance, the B's outline to the back surface? Are there any tricks to taking a long edge (with curves!) like that and "kissing" it into the glue?
ReplyDeleteBTW, I purchased your Craftsy class and have only had time to watch a couple of chapters, but am enjoying it very much. :-)
Hello Keeral, I'm so glad you found my blog and for taking the time to let me know you're finding it helpful to see these insights. And wow! You came here from my Craftsy class! I'm super flattered by your kind words - thank you! :D
DeleteYES! I have some tips with longer strips! I pour a larger puddle of glue and smear it thinly into a veneer layer. This way, the glue is not deep and will not coat your edge so thickly. Here is another post where I show how I lay down glue in a thin layer.
http://paperzen.blogspot.ca/2014/05/quilled-poppy-3-gluing-tips.html
Maybe I'll do another post about smearing - thanks for your questions!
Cecelia
Great tute for a beginner!! Truly appreciate the efforts by you on those close up shots. Gonna help much!!! Thanks for sharing generously!!
ReplyDeleteHello Sathya, thank you SO much for chiming in and letting me know it helps you. Please keep in touch and let me know how it affects your work! Your words are my encouragement!
DeleteCecelia
Awesome, awesome thank you for showing me how to glue the corners. I'm a newbie on quilling. I enjoyed learning how to do the corners. Thanks so much!
ReplyDeleteCecile Hammrich
Hi Cecile,
DeleteI'm so glad my tips helped you! Welcome to the world of quilling. I hope you have as much enjoyment from this craft as I have.
Cecelia
hmmm, I wonder if this blog is still active? I'm a starter-level quiller, in fact I've not yet done anything, but I am a lettering fanatic. Then this phrase caught my attention '... not everyone is as into the minutiae as I am ...'. Ah, a person after my own heart. My crafting buddy and I make a great team, she brings speed and spatial relations to the table. Me? I'm all about the tiny details, and planning them out, which takes f.o.r.e.v.e.r.! This sounds like fun.
ReplyDeleteHello Zoo, yes I'm right here, and YES – Another detail oriented type A has found me!!! Welcome to the world of quilling. I hope it brings you as much delight as it has for me.
DeleteCecelia